Monday, January 31, 2011

・ Tamagoyaki ・

One of my friend, she saw a tamago square pan while she was traveling in Japan and she was tempted to do a tamago badly.
But finally she didn't buy it. So I gave her one that I found in Daiso.
It's much more cheaper. Only 60 Baht.
But as price always comes with quality so this Daiso square pan is not suits for using on high heat. It has sticker on the pan warns us to use this pan only on simmer heat.
But for making tamago, simmer heat is OK.

So, if you already got the pan and ingredients, follow me.


Tamakoyaki
(for 2-3 pax)


Ingredients

3 Eggs
Sugar 1 tablespoon
Salt 1 teaspoon
Oil 1 tablespoon (For fry eggs)


Utencils
Small mixing bowl
Long chopsticks
Tamakoyaki square pan
Kitchen towel
Heat proof ladle
Sharp knife


Preparing step
Break the eggs into mixing bowl. Use chopstick to mix egg yolk and white. Careful not to make bubbles. Adding sugar and salt. Stir.


Direction
Place the pan on low heat until the pan is hot. Pour oil on the pan. Use kitchen towel to spread it evenly and absorb the excess oil.
Pour 2 tablespoons of egg mixture into pan. Tilt the pan until it's fully covered by egg. When the egg is cooked use the ladle to flip the egg forward 1.5 inch wide.
Pour 1 1/2 tablespoon of egg mixture into pan. Tilt the pan until it's fully covered by egg. Use the ladle to flip egg downward.
Repeat steps until no egg mixture left.
Bring tamakoyaki on the chop plate. Cut with sharp knife 1/2 inch wide.


Eat with Japanese rice or use as sushi ingredient. Enjoy. ;9

Tuesday, January 25, 2011

Restaurant review ・ Mizu's Kitchen ・


I've found this restaurant in 'a day' magazine.
Normally it's a teenagers magazines that present about new / different way of thinking.
But this issue is different. They present 100 yummy restaurants in Thailand and I think it's interesting because most of them have their unique style / selling point.

And for our first try we choose Mizu's Kitchen that is located near my bf's office so we don't have to waste much time on the road on our Friday night.

This restaurant is in Patpong area, where I don't think it's a dinner place at all. We lost in ago-go land and have to deny many shows those offer us for about 15 mins and finally we found it.


"Mizu's Kitchen"

Patpong soi 1, left hand side.


A retro style decoration


We ordered 2 recommended menus, Sarika beef steak and Stroganof rice.

They were delicious, the beef steak and beef in stroganof rice were taste good, soft and tender. They also provide the steak sauce separately but we think it's too salty so we didn't pour them all.

The size of steak platter is quite small while Stroganof rice is quite big.

This meal cost us about 500 Baht. including beer. Reasonable.

So.. if you have chance to stop by around Patpong area, let's try. :)

Thursday, January 20, 2011

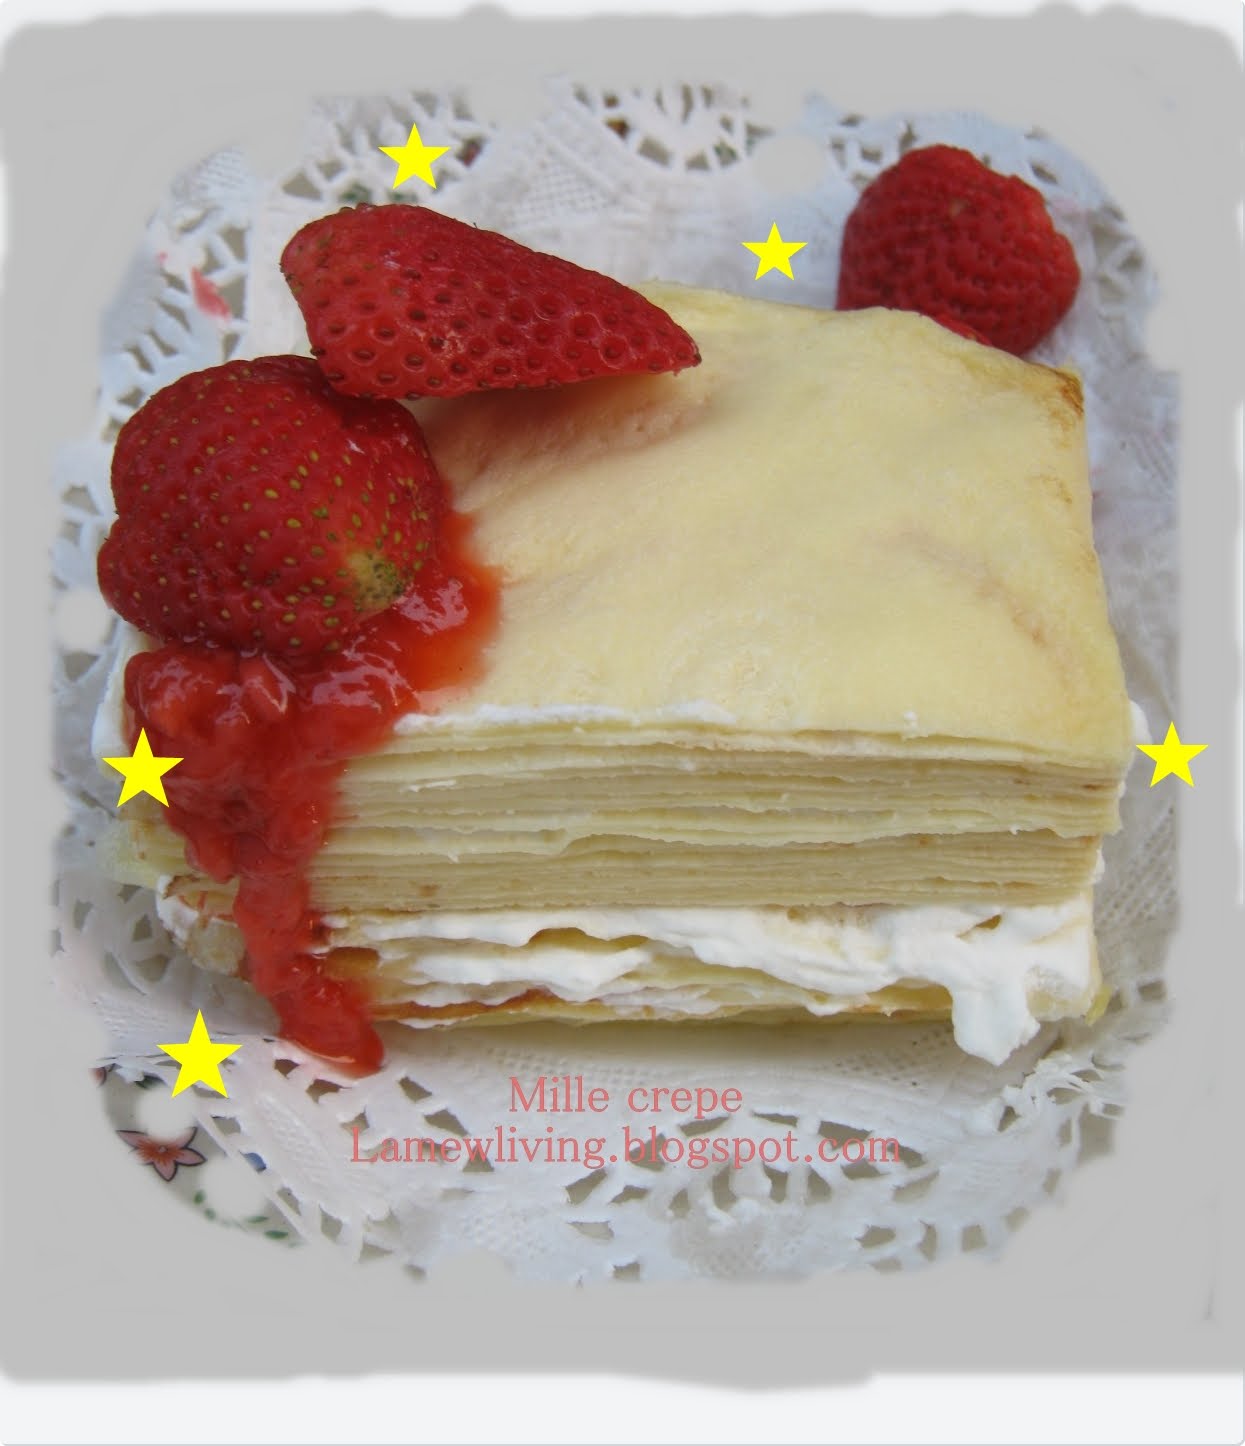
・Mille crepe・

Because I have whipped cream left from decorating blueberry cheesecake.
So I thought of make something that has whipped cream as an ingredient.
and I thought of Mille crepe.
It was the sweets that I always avoid. Because I think it's too complicate and I always admire those who can do it.
But since I have plenty of time and it's not an order from my customers so I have a chance to fail again and again, why don't give it a shot.

I search recipes from the internet and I found this one.
But since it was written in Thai. So I will translate as below.
Thank you khun Lookson for the recipe ka.

By the way, the recipe owner work more hard than me. She has 4 component in this cake.
- Sponge cake (base)
- Crepe
- Whipping cream (I use plain whipping cream, didn't add any icing or flavor)
- Strawberry sauce
But since I'm a super lazy girl, I decide to cut off the sponge cake part and using only crepe, whipping cream and strawberry sauce.


Crepes

Made 15 sheets of 9-inch crepes, or 24 sheets of 7-inch.

Ingredients: Crepe batter
4 Eggs
Milk 500 cc.
Sugar 1 tbsp.
All purpose flour 200 grams.
Salt 1 / 8 tsp.
Baking powder 1 / 2 tsp.
Vanilla 1 / 2 tsp.
40 g unsalted butter, melted.


Direction
Strat from sifted flour, salt and baking powder together.
In a large mixing bowl, add eggs, sugar and 250 cc milk in. Mix together.
Then,
gradually put 1 / 3 amount of flour into mixture. Then stir. Add the rest, stir.
Then pour the rest milk in.. Then stir.
Followed by the melted butter, vanilla. Then stir again.
Wrap with plastic cover and chill for 30 minutes to 2 hours.

When ready to fry crepe, bring crepe batter out of the fridge. Stir.
Put teflon pan on medium fire. Pour the batter in. Spread evenly.
Wait until you see the bubble then reverse side.
(Don't panic if you fail, me too. Haha..)
Cook until the crepe got golden. Bring it out.
Repete frying until the batter is out or until you feel tired (like me).

Don't worry about left over batter, you can keep it or up to 4 days.
But if you fry it all, that's better. You can keep crepes by store it in the ziplock back between pieces of wax paper and freeze it up to 2 months.
When you need it you just leave it thaw in the room temperature and then warm it in the pan/oven.


Ingredients: Strawberry sauce
2 Cups fresh or frozen strawberry
1 / 3 Cup sugar


Direction

Put Strawberry in the saucepan and use potato masher to mash up strawberries.
Add sugar and bring it on middle heat.
Wait until the sauce boiled and thicken up.
Now if any one wants a smooth sauce, use the seive and leave it cool.


Assemble

Laid crepe on a plate, spread over with whipped cream.
Then repeatedly the crepes - cream - crepe - cream - crepe action.
Until you don't have crepe / whipped cream / energy left.

Trim the edge for better look.
Chill and serve with strawberry sauce.

Tada!


Lastly, I was glad that I try. Enjoy :)

Monday, January 17, 2011

・Green tea tiramisu ・

First of all, I want to say "Merry Christmas and happy new year" even it's been really late right now.


I also gone from my blog for a long time. No excuse. Just because of my laziness - -' .

Last Christmas I've made this treats for my friends and they all of it.
You guys can follow the instruction easily. I think this is quite a fuss-free tiramisu recipe.
The special thing is that it is grean tea tiramisu. I love green tea, especially when it's come in cold / creamy form and I don't drink coffee so this is the first time that I urge to try tiramisu recipe.

But what I don't quite happy with my tiramisu is the color of green tea I used.
It's dark green and make most people feel a bit worry that it would be some kind of fungus. ( ;´Д`)Sob sob...


Green tea tiramisu
Serve 10
Recipe from Okashi sweet treats made with love


Ingredients

Biscuit sponge 1 quantity (I used pre made lady fingers)

Mascarpone cheese filling

Egg yolks 40 g, about 2 eggs
Caster (superfine) sugar 70 g
Mascarpone cheese 250 g
Whipping cream (35% fat) 100 g
Egg whites 70 g
Grean tea powder 10 g + extra for dusting
Hot water 90 g


Direction

1. Prepared biscuit sponge (I skipped this step due to lady fingers that I used)
2. Prepare mascarpone cheese filling. Combine egg yolks and 30 g sugar in a bowl and beat until mixture thickens and becomes pale yellow in colour. Add mascarpone cheese and mix well.
3. Whip whipping cream in a chilled bowl until stiff peaks form. Add whipped cream to the mascarpone cheese mixture and fold through.
4. Make meringue. Place egg whites in a clean bowl and beat until foamy. Add remaining sugar and beat until stiff peaks form and egg whites are glossy. Fold into mascarpone cheese mixture.
5. Place green tea powder in a small bowl and mix with hot water a little at a time. Stir until completely dissolved. Quickly dip both ends of each biscuit sponge (lady fingers) in the grean tea mixture. Then place in a medium serving dish such as a 27-cm oval dish, or into individual serving glasses.
6. Spread half of mascarpone cheese filling in a layer over soaked biscuit sponges (lady fingers). Dip more biscuit sponges into green tea mixture and place on top of mascarpone cheese layer.
Spoon over remaining mascarpone cheese filling.
7. Dust generously with green tea powder and refridgerate until required. Tiramisu can be kept refrigerated for up to 2 days.

Eat chilled and you will feel like youe are in the heaven, enjoy. :)

Saturday, December 25, 2010

The Daring Cooks December 2010 Challenge: Poach to Perfection!

Jenn and Jill have challenged The Daring Cooks to learn to perfect the technique of poaching an egg. They chose Eggs Benedict recipe from Alton Brown, Oeufs en Meurette from Cooking with Wine by Anne Willan, and Homemade Sundried Tomato & Pine Nut Seitan Sausages (poached) courtesy of Trudy of Veggie num num.

I haven't try to poach egg before and I thought it would be not so difficult.
I saw it many times in (cooking) comics and it's seems really easy. (Just throw eggs into water) And after I have join this challenge, I realize that, of course , it has to be that easy because they are not in real life. :D

And now it's time to show my (un)perfect poach. Haha...


I decided to combine my poached egg with spaghetti again.
And this time it's quite different because this spaghetti is sweet.
It might feel strange at the first time but I think the taste is smoother along the way.

Again, I used recipe from my favorite "Pasta Pasta" book.


Pasta with poached egg, mozzarella, and tomato.

Ingredients

Capellini 50 grams
Boiling water 1.5 Liter
Salt 1 tablespoon
(Synthesis salt 2/3 tablespoon)

Mozzarella 30 grams
Ripe tomato 1
Basil 4-5 leaves

A ingredients
Olive oil 1 tablespoon
Sugar 1 tablespoon
Salt 1/4 teaspoon
Pepper to taste

Olive oil 2 tablespoons
Poached egg 1
Pepper to taste


Direction:

I. Poach egg

Ingredients
Eggs (size is your choice)
Splash of vinegar (for poaching)
  • Add salt and a splash of vinegar (any kind will do). I added about a tablespoon of vinegar to my small saucepan (about 3 cups of water/720 ml of water), but you may need more if you’re using a larger pan with more water.
  • Crack eggs directly into the very gently simmering water (or crack first into a bowl and gently drop into the water), making sure they’re separated. Cook for 3 minutes for a viscous but still runny yolk.

In this book, it also suggest another way to poach egg by using instant noodle cup by put egg (with shell) in the cup. Pouring hot water about 8 part of the cup, cover with foil and wait for 25 minutes.
But I didn't try this method because I don't have any instant noodle cup. But I think I should keep some to make this experiment next time.

II. Spaghetti

  • Rubbing mozzarella and knead it to square shape size 1.5 c.m. Cut tomato into square shape size 1 c.m. Leave core and seeds. Coarsely chop basil and combine all 3 ingredients with A ingredients. Stir.
  • Put salt in boiling water, break half of capellini and put it in the pot.
    Boil as long as suggested and bring to cold water. Drain.
  • Combining cooked capellini with olive oil and mix with mozzarella mixture in the first bullet. Mix well.
  • Bring to plate. Put poached egg on top. Serve.
Enjoy :)

Wednesday, December 8, 2010

・Spaghetti Basil Sauce ・

Another of my "Home alone" breakfast that I would like to introduce is "Spaghetti Basil Sauce".
I tend to cook many of spaghetti dishes because it is quick and easy.
Especially when I have this book - Pasta Pasta. That I already introduced here.


As I said, most of the recipes in this book require only a bowl and microwave.
And what I like most is it does not ask for many ingredients for each dish and because of less seasoning, so the taste and aroma will reflect the quality of ingredients that you use.

Let's get started.


・Spaghetti Basil Sauce ・
1 servings


Ingredients

Spaghetti 100 grams
Boiling water 1.5 Liter
Salt 1 tablespoon
(Synthesis salt 2/3 tablespoon)

Basil sauce
Basil 1 pack (20 grams)
Sliced garlic 2 cloves
Sliced red chili 1
Olive oil 1 tablespoon
Grinned white sesame 1 tablespoon
Salt 1/4 teaspoon
(Synthesis salt - use a pinch)
Pepper to taste


1. Divide basil, chop and leave some for decoration.
2. Put salt in boiling water, break half of spaghetti and put it in the pot.
Boil as long as suggested .
3. Prepare heatproof bowl mix basil, garlic, red chili, olive oil.
Wrap with a little open at the edge. Bring to microwave (600 watts) for 1.30 min.
4. Take the bowl out of the microwave, open (BE CAREFUL OF THE HEAT!!),
add grinned white sesame, salt, and pepper. Stir.
5. Mix sauce mixture with cooked spaghetti. Decorate with basil.


Enjoy :)

Friday, December 3, 2010

・Sophie Dahl's Omelette Arnold Bennett ・

Hi! everyone.

Since this week I'm alone in the house.
So I don't have pre-packed breakfast from my mom and I have to make it myself.
Sometimes I quite jealous those who can drink only coffee and count that as their breakfast.
It looks so easy, compare to me that have to eat a big meal breakfast.

But once you start eating a real meal on your breakfast, you can't turn back to your "coffee only" breakfast again.
You will be super starving and won't have any energy to do things.
(Am I too dramatize ? ;b)

Another shameful reason is that my stomach is a super grumpy one. If you don't feed it on time, it will rumbling like it says "Feed me... feed meeee......". LOL LOL
It's sound is super loud and will increasing the volume until I feed it.

And because I have to take care of everything before I leave the house, feeding cats, dogs, and fish, I have to choose less complicated and quickly prepared recipe.

And I found this,


What I love about the recipe is all ingredients are basic ingredients that most kitchens already has plus the procedure that is quick and easy.
I did adjust a little by adding cooked rice to help me survive until noon. (As I said, I need a BIG meal breakfast. :) )
And because I didn't have creme fraishe so I made it up by adding yogurt into whipping cream. Here is the direction. (Thanks to khun Pook from Dailydelicious. :) )

Now... my failure's turn, see .. even the easiest recipe, I still made mistake.
How incredible I am. LOL LOL

I bring the omelette out of the oven too soon and the egg still raw. - -'

But it is easy to fix, I just put it back in the oven. Haha..
And I garuntee that the taste is still good.
I think this is a great combination like Miss Dahl said; Parmesan, eggs, and fish these ingredients brings a spectacular taste and aroma. Ummm... :9


And this is Lamewliving's version of Omeltte Arnold Bennett.


Tada !!


Yum. :)