Showing posts with label cake. Show all posts

Tuesday, June 5, 2012

Snack review ・Custard Cake ・

พูดถึงคัสตาร์ดเค้ก บ้านเราก็มียูโร่ คัสตาร์ดเค้กที่อยู่มานาน วันหนึ่งฟัน-โอ เขาก็ออกคัสตาร์ดเค้กมาบ้าง ก็เลยอยากรู้ว่า เอ.. แล้วของใครมันจะถูกใจเรากว่ากันน้า.. ก็เลยเกิดรีวิวนี้ขึ้นค่ะ
ตอนแรกก็กะว่าจะเปรียบเทียบแค่ 2 ยี่ห้อ แต่ไปค้นร้าน แล้วเจอคัสตาร์ดเค้กเวียดนามเข้าอีกยี่ห้อนึง เขาชื่อโซไลท์ ก็เลยจับมาเข้าประกวดร่วมกันไปเลย

หน้าตา packaging ของทั้ง 3 ยี่ห้อ ก็จะเป็นเยี่ยงนี้นะคะ
ซองก็เป็นสีเหลืองเหมือนๆกันนะคะ น่าจะสื่อถึงคัสตาร์ดแหละ แล้วก็โชว้ใส้ด้านในที่ดูเยิ้มพอกัน ซองฟัน-โอ คัสตาร์ดเค้กจะมีน้องแพนเค้กพรีเซนเตอร์เสริมเข้ามาด้วย แถมลายเซ็นอีกต่างหาก ส่วนของโซไลท์ ซองเขาจะด้านๆ ดูไฮ แต่โดยรวม เราชอบซองของยูโร่ฯนะ ดูลงตัวดี


น้ำหนักสุทธิ:
ยูโร่ คัสตาร์ดเค้ก 17 กรัม
ฟัน-โอ คัสตาร์ดเค้ก 20 กรัม
โซไลท์ 20 กรัม

ส่วนประกอบที่สำคัญโดยประมาณ:
ยูโร่ คัสตาร์ดเค้ก
ไข่ไก่ 40% กลูโคสไซรัป 19% แป้งสาลี 16% น้ำคาล 15% น้ำมันปาล์ม 9.5% นมผง 0.5%

ฟัน-โอ คัสตาร์ดเค้ก
ไข่ไก่ 31% น้ำตาล 22% แป้งสาลี 19% น้ำมันพืช 12% น้ำเชื่อมกลูโคส 11% นมผง 2.5% อิมัลซิไฟเออร์ 1% (แต่งกลิ่นและสีสังเคราะห์ ใช้วัตถุกันเสีย)

โซไลท์
 แป้งสาลี 30% ไข่ไก่ 28% น้ำตาล 19% น้ำมันปาล์ม 10% ครีมเนย 10% (แต่งกลิ่นและสีสังเคราะห์ ใช้วัตถุกันเสีย)

พิจารณารูปลักษณ์ภายนอกกันไปแล้ว ก็มาดูภายในกันบ้างค่ะ เปิดถุงออกมาป๊าบ แต่ละยี่ห้อเค้าก็จะมีกลิ่นหอมในแบบของตัวเอง อย่างยูโร่ คัสตาร์ดเค้ก จะเป็นกลิ่นหอมหวานๆ แบบขนม, ฟัน-โอ คัสตาร์ดเค้ก เป็นกลิ่นหอมไข่ ส่วนโซไลท์นั้นก็หอมแบบหวานๆเหมือนยูโร่ฯ แต่กลิ่นจะจางๆค่ะ


ดูที่รูปร่างขนม จะเห็นว่ารูปร่างของยูโร่ คัสตาร์ดเค้ก กับฟัน-โอ คัสตาร์ดเค้กเป็นทรงโดมครึ่งวงกลมเหมือนกัน ในขณะที่โซไลท์ด้านบนจะไม่นูนเป็นโดมขึ้นมาแต่จะเรียบๆค่ะ

สำหรับสีสันยูโร่ คัสตาร์ดเค้กจะมีสีเข้มที่สุด รองลงมาคือโซไลท์ และฟัน-โอ คัสตาร์ดเค้ก ตามลำดับ

ลองดูไส้ขนมกันเต๊อะ เริ่มจาก ยูโร่ คัสตาร์ดเค้ก ที่เอิ่ม... หักครึ่งแล้วยังเจอไส้คัสตาร์ดแบบฉิวเฉียดมาก ส่วนรสชาติก็... หวานเจี๊ยบจ้า... ทั้งไส้และแป้ง หวานชนะเลิศยี่ห้ออื่นๆเลยทีเดียว แต่เนื้อขนมปังจะชุ่มๆกว่ายี่ห้ออื่น

ต่อด้วยฟัน-โอ คัสตาร์ดเค้กที่ไส้อยู่ตรงกลางเป๊ะ มีความยืดเยิ้มที่น่าประทับใจ แม้ว่าจะไม่ได้เยอะมากมาย รสชาติไม่หวานมาก แต่แปลกที่แม้จะมีไส้มากกว่ายูโร่ฯ แต่มันฝืดคอจังแฮะ แถมไส้ก็ออกจะหนืดๆ เลยช่วยเพิ่มพลังฝืดๆได้เป็นอย่างดี

ส่วนโซไลท์นั้น.. มีความงงเล็กน้อย คือ... มันไม่เหมือนไส้คัสตาร์ดเลย เหมือนเป็นโซนชุ่มฉ่ำมากกว่า เพราะไส้ดูเป็นเนื้อเดียวกับขนมปังมาก ไม่ยืดไม่เยิ้มแต่อย่างใด อ่ะ... มาลองชิม ขนมปังออกจะร่วนและแห้งกว่ายี่ห้ออื่น กัดคำแรกก็จ๋อยๆหน่อย แต่พอกินรวมกับไส้ อ้าว... อร่อยขึ้นแฮะ เพราะอย่างที่บอกว่า ไส้มันไม่เชิงเป็นคัสตาร์ด มันเป็นเหมือนขนมปังที่ทาเนยมาฉ่ำๆน่ะค่ะ มันเลยช่วยให้แป้งแห้งๆร่วนๆดีขึ้นได้พอสมควร กลิ่นหอม รสชาติก็ไม่ได้หวานมาก


หลังจากทานเสร็จ มาดูความมันของขนมกัน สรุปว่ายูโร่ คัสตาร์ดเค้ก ชนะเลิศจ้า


โดยสรุป เจ้าของบล๊อกชอบยี่ห้อโซไลท์ค่ะ หวานน้อย และมันน้อยที่สุด หลังจากทานหมด 3 ชิ้น อยากบอกว่าเลี่ยนมากค่ะ ก็ลองดูปริมาณน้ำตาลของขนมแต่ละชิ้นสิคะ จริงๆแล้วก็ไม่ดีต่อสุขภาพเท่าไหร่ เก็บไว้ทานเวลาจำเป็นจริงๆก็แล้วกันเนอะ :)

Friday, May 20, 2011

・Banana cake with chocolate frosting ・

Nearby my house, there is a cooker's utensils store called "Verasu".
I like this place, moreover utensils they have demonstration cooking class every Saturday.
After watching the cooking demonstration, we will find many of fresh bake donuts/waffles to serve us. ('Coz they want to sell their waffle/donut makers Haha..)
And they also have cafe that all the dessert made from spelt flour to prevent gluten.
And they are delicious. Ummm... :)

Sometimes I don't participate in the demonstration class but I only just buy the recipe from the counter (only 10 Baht each).
But I suggest that being participated will profit you more because demonstrator usually tells techniques / minor details those are not publish in the recipe sheet.

Recipe I use today is also from Verasu class.
I did this because one of my colleague requested for dessert that has banana and chocolate in it.

The cake is softer than normal butter cake and it go along well with chocolate frosting.
(My mistake is I used salted butter and it makes frosting taste salty, some like it, but I would not suggest that anyway.)


เจ้าของบล๊อกชอบไปเที่ยวเล่นที่วีรสุค่ะ
ที่ชอบก็เพราะว่าดูเป็นร้านค้าเฉพาะทาง สำหรับคนที่ชอบทำอาหาร อยากได้อุปกรณ์อะไรก็มีหมด
ทุกวันเสาร์มีการสอนทำอาหาร/ขนมจากอุปกรณ์เครื่องใช้ไฟฟ้าต่างๆของร้าน
ดูสาธิตจบ ลงมาเดินเล่น ก็มีขนมที่ออกจากเตาใหม่ๆ ทั้งวาฟเฟิล โดนัท ให้กินกันเพลินๆ
แล้วถึงจะไม่ว่างดูการสาธิต เราก็พุ่งเข้าไปขอซื้อสูตรจากพนักงานที่เคาน์เตอร์ได้เลยค่ะ สูตรละ 10 บาทเท่านั้น (แต่แนะนำว่าถ้าไปดูสาธิตเองจะดีกว่าค่ะ เพราะบางทีพี่ๆเค้าก็มีเทคนิคมาบอกกัน)

สูตรเค้าแต่ละสูตรก็ใช้ได้เลยค่ะ ลองชิมมาหลายแล้ว แต่ข้อเสีย (หรือเปล่า) ก็คือสูตรเค้าค่อนข้างใหญ่
บวกกับเจ้าของบล๊อกชอบทำชิ้นเล็กๆน่ะค่ะ เลยได้จำนวนมหาศาลเชียว พอทำเสร็จก็ต้องมานั่งคิดว่าจะแบ่งใครบ้างดีน้า
(ส่วนใหญ่พี่ๆที่ออฟฟิศเนี่ยแหละค่ะ ที่จะกลายเป็นเหยื่อ ;b)

สูตรวันนี้ก็มาจากวีรสุค่ะ
เลือกมาทำก็เพราะว่าพี่ที่ออฟฟิศรีเควสท์เค้กอะไรก็ได้ที่มีกล้วย และช็อกโกแลตเป็นส่วนประกอบหลัก
เนื้อเค้กเบาเกินกว่าที่จะเชื่อว่าเป็นเค้กเนยค่ะ Frosting ก็เข้ากั๊น เข้ากันกับเค้ก
(ครั้งนี้เจ้าของบล๊อกดันขี้เกียจออกไปซื้อเนยจืด เลยใช้เนยเค็มที่มีอยู่ในบ้านไปก่อน เลยกลายเป็น Frosting รสออกเค็มซะงั้น แต่พี่คนนึงบอกว่าดี ไม่เลี่ยน อืม.. ก็นานาจิตตังเนอะ กลายเป็นดีไป แต่เจ้าของบล๊อกก็แนะนำว่าอย่าใช้เนยเค็มเลยเน่อ)

ถ้าเตรียมอุปกรณ์พร้อมแล้วก็มาเริ่มกันเลยเจ้า


・Banana cake with chocolate frosting ・
Makes 1 28-c.m. round cake pan / 20 mini cakes


Ingredients: Banana cake

Cake flour 240 grams
Baking powder 1 3/4 teaspoon
Baking soda 1 1/4 teaspoon
Salt 3/4 teaspoon
Castor unrefined suger 180 grams
Unsalted butter 140 grams
Mashed ripe banana 200 grams (about 2-3 bananas)
Egg 3
Yogurt (natural flavor) 1/2 cup
Vanilla 1 1/4 teaspoon


ส่วนผสม: เค้กกล้วยหอม

แป้งเค้ก 240 กรัม
ผงฟู 1 3/4 ช้อนชา
ผงโซดา 1 1/4 ช้อนชา
เกลือป่น 3/4 ช้อนชา
น้ำตาลทรายสีรำป่น 180 กรัม
เนยสด (จืด) 140 กรัม
กล้วยหอมสุกบด 200 กรัม (ประมาณ 2-3 ลูก)
ไข่ไก่ (เบอร์ 2) 3 ฟอง
โยเกิร์ตรสธรรมชาติ 1/2 ถ้วยตวง
วานิลลา 1 1/4 ช้อนชา


Directions: Banana cake

1. Sifting the flour before doing measurement, combine flour with baking powder, baking soda and salt. Set aside.
2. Beating butter until fluffy, gradually add sugar and banana, mix well.
3. Add egg, one at a time.
4. Add flour --> yogurt --> flour, mix to just combined.
5. Pour the batter in prepared cake pan (28 cm. diameter).
6. Baking at 150°C about 15 minutes then decrease heat to 140°C about 25-30 minutes until done. Leave on wire rack.

วิธีทำ: เค้กกล้วยหอม

1. ร่อนแป้งก่อนตวง 1 ครั้ง แล้วร่อนรวมกับผงฟู ผงโซดา เกลือป่นเข้าด้วยกัน พักไว้
2. ตีเนยให้ขึ้นฟูเป็นครีมด้วยเครื่องตีไข่ ระดับความเร็วปานกลาง ค่อยๆใส่น้ำตาลทรายจนหมด ใส่กล้วยหอม ตีต่อจนส่วนผสมเข้ากันดี
3. ใส่ไข่ไก่ลงทีละฟอง ตีให้เข้ากันทุกครั้ง ก่อนใส่ไข่ฟองต่อไป
4. ใส่แป้งสลับกับโยเกิร์ตที่ผสมวานิลลา โดยแบ่งแป้งเป็น 2 ส่วน โยเกิร์ต 1 ส่วน วิธีผสมใช้ความเร็วต่ำสุด ตะล่อมพอเข้ากัน
5. เทส่วนผสมที่ได้ลงในพิมพ์กลมขนาดเส้นผ่านศูนย์กลาง 28 ซ.ม. ที่รองด้วยกระดาษไขและทาเนยขาวเตรียมไว้
6. นำเข้าอบที่อุณหภูมิ 150°C เวลา 15 นาที แล้วลดไฟเหลือ 140°C อบต่ออีกประมาณ 25-30 นาที หรือจนกระทั่งสุกเหลือง นำเค้กออกจากพิมพ์ พักไว้ให้เย็น


Ingredients: Chocolate Frosting

Dark chocolate 100 grams
Icing sugar 200 grams
Whipping cream 1/4 cup
Salt 1/4 teaspoon
Unsalted butter 227 grams
Vanilla 1 teaspoon


ส่วนผสม: ครีมช็อกโกแลต

Dark chocolate 100 กรัม
น้ำตาลไอซิ่ง 200 กรัม
วิปปิ้งครีม/นมข้นจืด 1/4 ถ้วย
เกลือป่น 1/4 ช้อนชา
เนยสด (จืด) 227 กรัม
วานิลลา 1 ช้อนชา


Directions: Chocolate frosting

1. In the heatproof bowl, mixing dark chocolate, icing sugar, whipping cream and salt, put in microwave using high heat (800-900 watt) about 1 1/2 minute. Whisk until smooth, add vanilla. Leave to cool.
2.Beating butter until fluffy, gradually add chocolate mixture in the butter, mix well.

วิธีทำ: ครีมช็อกโกแลต


1. นำ Dark chocolate น้ำตาลไอซิ่ง วิปปิ้งครีม เกลือป่น ใส่ในถ้วยตวงของเหลวขนาด 2 ลิตร นำเข้าเตาไมโครเวฟ ใช้ไฟ High (800-900 วัตต์) เวลา 1 1/2 นาที ใช้ตะกร้อค่อยๆคนให้ส่วนผสมเนียน ใส่วานิลลา พักทิ้งไว้ให้เย็น
2. ตีเนยสดให้ขึ้นฟูเป็นครีมด้วยเครื่องตีไข่ ระดับความเร็วปานกลาง ค่อยๆเทส่วนผสมข้อ 1 ลงตีต่อจนส่วนผสมเข้ากันดี


Decoration
If you do round cake, slice cake to 2 parts, add thin layer of frosting. Place the other half above and cover with chocolate frosting. Decorating with white/dark chocolate/banana/cherries as you like.
(I did use chocolate and sun-dried banana to decorate.)

ประกอบร่าง

ใช้ที่แบ่งเค้กแบ่งออกเป็น 2 ส่วน ปาดครีมช็อกโกแลตบางๆให้ทั่วชิ้นเค้ก นำเค้กอีกชิ้นวางซ้อนทับ ปาดครีมช็อกโกแลตให้ทั่วทั้งชิ้นเค้ก แต่งหน้าด้วยช็อกโกแลตขาวและดำ โดยบีบเป็นเส้นสลับกันให้สวยงาม ตกแต่งด้วยกล้วยหอมหั่น และเชอร์รี่แดงให้สวยงาม
(สำหรับชิ้นที่ถ่ายรูปมาอวด เจ้าของบล๊อกทำเป็นคัพเค้ก บีบหน้าด้วย choc
olate frosting แล้วแต่งหน้าด้วยกล้วยตากค่ะ)


Enjoy :)

Sunday, May 15, 2011

・White chocolate mousse and raspberry with yellow sponge cake ・

I love the mousse, I love the cake, I love the way it combine with raspberry, I love every single combination of this dessert. :)

Normally I don't do any complicated or many-steps cake or cake with frosting because I'm too lazy. Haha...
One day, my friend ask me to do any cake for her. Anything that I would like to do.
So I think why won't I try something new and finally I came up with this dessert.

All of my friends love it. So I suggest you to try. :)
I used recipe from The Sono Baking Company Cookbook.


ก็อย่างที่เห็นกันจากในบล๊อกค่ะ เจ้าของบล๊อกเป็นคนขี้เกียจ (ยอมรับอย่างไม่อายเลยนะยะ - -')
เวลาทำเค้กก็เลยไม่ค่อยขอบทำเค้กที่มันมีหลายสเตป หรือเค้กที่ต้องมีครีมทั้งหลาย
มาวันนึง เพื่อนมาขอให้ทำเค้กให้ค่ะ เค้กอะไรก็ได้ ก็เลยคิดว่า เออ.. เราน่าจะทำอะไรใหม่ๆบ้างเนอะ
ลองทำแบบยุ่งนิดๆดูบ้างก็ดี จะได้เป็นการฝึกฝีมือไปในตัว
เลยมาความหาสูตรจากหนังสือทำขนมกองพะเนินที่มีอยู่ค่ะ

แล้วก็มาพบกับสูตรจากหนังสือเล่มนี้ ทาด้า...


เอาจริงๆแล้วก็ไม่ยุ่งยากเท่าไหร่หรอกค่ะ กลัวไปเองทั้งน้านนนน
เลยอยากจะชวนให้ลองทำกันดูนะคะ
เหยื่อทุกคนที่ได้ชิม รับประกันว่าอร่อยค่า :D


Yellow Sponge Cake
Makes: 1 9-inch cake


Ingredient

3/4 cup cake flour
1/2 cup cornstarch
4 large eggs, at room temperature
4 large egg yolks, at room temperature
2/3 cup sugar
1 tsp. coarse salt
1 tbsp. pure vanilla extract
1 cup vegetable oil


ส่วนผสม

แป้งเค้ก 3/4 ถ้วย
แป้งข้าวโพด 1/2 ถ้วย
ไข่ 4 ฟอง (อุณหภูมิห้อง)
ไข่แดง 4 ฟอง (อุณหภูมิห้อง)
น้ำตาล 2/3 ถ้วย
เกลือ 1 ช้อนชา
วานิลลา 1 ช้อนโต๊ะ
น้ำมันพืช 1 ถ้วย


Directions:

1. Set the oven rack in the middle position. Preheat the oven to 375*F. Spray a 9 by 2-inch (or 9 by 3-inch) round cake pan with vegetable spray. Line a baking sheet with parchment paper or a nonstick silicone baking mat; set aside.

2. In a medium bowl, sift together the flour and cornstarch; set aside. In the bowl of a standing mixer fitted with the whisk attachment, beat the whole eggs, the yolks, the sugar, salt, and the vanilla on high speed until thick and pale yellow colored, and the mixture holds a thick ribbon when the whisk is lifted from the bowl, 7 to 8 minutes.

3. Remove the bowl from the stand. Add the dry ingredients and quickly and gently fold them into the batter with a rubber spatula. Gradually add (drizzling, if possible) the oil, while folding.

4. Pour the batter into the prepared cake pan, set it on the prepared baking sheet, and bake until a tester comes out clean when inserted into the center of the cake 25 to 30 minutes.

5. Remove from the oven and turn the cake out immediately on a wire rack (don't let it cool in the pan, as the steam may collapse it). Let cool completely, at least 1 hour.


วิธีทำ

1. อุ่นเตาอบที่ 190°C เตรียมพิมพ์ด้วยสเปรย์น้ำมันลงบนพิมพ์ แล้วรองด้วยกระดาษรองอบ

2. ร่อนแป้งและแป้งข้าวโพดเข้ากัน พักไว้ หยิบไข่ ไข่แดง น้ำตาล เกลือ วานิลลา มาผสมกัน ตีด้วยเครื่องตีไข่ไฟฟ้าความเร็วสูงจนข้น และสีอ่อนลง (Ribbon Stage) ประมาณ 7-8 นาที

3. ใส่ส่วนผสมแห้ง แล้ว fold เบาๆ ค่อยๆเพิ่มน้ำมันขณะ fold

4. เทส่วนผสมใส่พิมพ์ อบประมาณ 25 นาที จนสุก

5. นำเค้กออกจากเตาพักบนตะแกรงทันที อย่าปล่อยให้เย็นในพิมพ์นะคะ เพราะไอน้ำจะทำให้เค้กยุบค่ะ รอให้เย็นประมาณ 1 ชั่วโมงนะคะ


White Chocolate Mousse and Raspberry

Serve: 6


Ingredients

1 1/2 cups heavy cream

1/2 vanilla bean, cut in half lengthwise and scrapped, or 1 1/2 teaspoons pure vanilla extract

6 ounces white chocolate, chopped

4 large egg whites at room temperature

1/4 cup sugar

1 to 1 1/2 cup raspberries


ส่วนผสม

1 1/2 เฮฟวีครีม (เจ้าของบล๊อกใช้วิปปิ้งครีมแทนค่ะ)
ก้านวานิลลา 1/2 ก้าน ผ่าตามยาว แล้วขูดเมล็ดออกมานะคะ หรือใช้ vanilla extract 1 1/2 ช้อนชาค่ะ
White chocolate ประมาณ 170 กรัม
ไข่ขาว 4 ฟองที่อุณหภูมิห้อง
น้ำตาล 1/4 ถ้วย
ราสพ์เบอร์รี่ 1 ถึง 1 1/2 ถ้วย


Directions

1. In a small saucepan, bring 1/2 cup of the cream to simmer with the vanilla bean and seeds, if using. Pour the cream over the white chocolate in a heatproof bowl and let stand for 5 minutes to melt Remove the vanilla bean, if using Stir until smooth. Let cool. Stir in the vanilla extract, if using.
2. Bring 1 inch of water to a simmer in the bottom of a double boiler, set it over (not in) the simmering water, and whisk to dissolve the sugar just until it melts, 1 to 2 minutes. (The mixture should feel just warm to the touch, and not gritty.)
3.Transfer to a bowl of a standing mixer fitted with the whisk attachment and beat until stiff peaks form Whisk about one-quarter of the meringue into the cooled chocolate mixture to lighten it, then fold in the rest with a rubber spatula.
4. Add the remaining 1 cup cream to the mixture bowl, and beat with the whisk attachment until medium peaks form. Gently fold into the white chocolate mixture. Cover the mousse with plastic wrap and refrigerate overnight. (But I didn't just wait for the cake to cool and then I do the assemble.)


วิธีทำ

1. นำครีม 1/2 ถ้วยตั้งไฟ ใส่เมล็ดวานิลลากับก้านวานิลลาลงไป พอเดือดปุดๆ ก็เทใส่ white chocolate ทิ้งไว้ประมาณ 5 นาทีให้ white chocolate ละลาย เอาก้านวานิลลาออก คนจนเข้ากัน ถ้าใช้ vanilla extract ก็ใส่ตอนนี้เลยจ้า
2. เอาน้ำใส่หม้อ สูงประมาณ 1 นิ้ว นำไปต้ม ด้านบนวางถ้วย (Double boiler) ผสมน้ำตาลกับไข่ขาวในถ้วย คนจนน้ำตาลละลาย
3. เปลี่ยนไข่ขาวมาใส่โถ ตีจนตั้งยอดแข็ง แบ่งมา 1/4 ใส่ในส่วนผสม white chocolate ที่เย็นแล้ว เมื่อเข้ากันจึงผสมส่วนที่เหลือ
4. ตีครีมที่เหลืออีก 1 ถ้วยจนตั้งยอดกลาง ค่อยๆ fold ในส่วนผสม white chocolate คลุมด้วยพลาสติก wrap แช่เย็น 1 คืน (แต่เจ้าของบล๊อกไม่ได้แช่ถึง 1 คืนน่ะค่ะ พอเค้กเย็น ก็เอามาประกอบร่างเลย)


Assemble

Layer into individual cup, starting with a layer of sponge cake that I already cut to circle shape, followed by a layer of mousse and raspberries. Repeat one more layer of each, and top with raspberry. Serve chilled.


ประกอบร่าง

เจ้าของบล๊อกทำใส่ถ้วยนะคะ ทานง่ายดี เอาเค้กที่ตัดเป็นวงกลมไว้แล้ว วางลงไปที่ก้น ตามด้วยมูส และราสพ์เบอร์รี่ ทำซ้ำจนเต็มถ้วยค่ะ สุดท้ายโปะด้วยมูส และราสพ์เบอรร์รี่ ทานเย็นๆนะคะ เริ่ดมั่กส์ :)


Enjoy :)

Sunday, April 17, 2011

・Caramel cake ・

This is the cake that I never think of making it.
Because of the name 'caramel cake' that makes me think that it's gonna be too sweet.
But the reason that brings me to meet this recipe is my sister.
She is browsing my cake book and found this one so she requested me to do this for her.
And because I'm a good sister (Haha..) so I answer her need.
This recipe is from this book.


เค้กนี้เป็นเค้กที่เจ้าของบล็อกไม่เคยคิดจะทำเลยค่ะ
ด้วยชื่อเค้กคาราเมลทำให้รู้สึกว่ามันจะต้องหวานมากแน่ๆ
แต่ที่ได้ฤกษ์ทำก็เพราะว่าพี่สาวมานั่งเปิดหนังสือเค้กในห้อง แล้วก็มาป๊ะกับเค้กคาราเมลนี้เข้า ก็เลยรีเควสท์มาค่ะ
หันไปหันมา อ๊ะ ของครบ เริ่มทำเลยดีกว่าค่ะ

พูดถึงหนังสือเล่มนี้ซักนิด เจ้าของบล็อกชอบนะคะ เพราะคนเขียนเค้าเขียนละเอียดมากกกกก (มากจริงๆนะเออ)
ถ้าใครเคยอ่านเอ็นทรี่ที่เจ้าของบล็อกทำขนมปังล่ะก็ จะเห็นว่ามีวิธีทำที่ยาวเหยียดสุดๆ
นั่นแหละค่ะ คนเขียนเดียวกันเลย แต่ถึงเค้าจะเขียนยาวๆก็ไม่น่าเบื่อนะคะ เหมือนฟังเพื่อนมาเล่านู่นนี่ให้ฟังดีกว่า
ภาพก็สวยค่ะ (เจ้าของบล็อกกรี๊ดหนังสือทำอาหาร / ขนมที่ภาพสวยเป็นทุนเดิมอยู่แล้ว)
แล้วขนมที่ออกมาก็อร่อยทีเดียวค่ะ ฉะนั้น ถ้าใครกำลังเล็งๆเล่มนี้อยู่ละก็ เชียร์นะคะ


Caramel cake
makes 12 mini cupcakes


Preparation

- Preheat oven at 350 degree Fahrenheit
- Greasing pan with butter (I use oil spray)


เตรียมตัวก่อนอบ

- อุ่นเตาอบที่อุณหภูมิ 180 องศาเซลเซียส
- ทาพิมพ์ด้วยเนย (ตามสูตรใช้เนยขาว แต่เจ้าของบล็อกไม่ชอบ เพราะมันล้างออกยากอ่ะค่ะ เลยใช้น้ำมันแบบสเปรย์แทน) พิมพ์เค้กเป็นพิมพ์ทรงสูงนะคะ (เจ้าของบล็อกใช้พิมพ์มินิชีสเค้กค่ะ)


Ingredients : Caramel cake

- Flour 1 cup
- Baking powder 1/2 tsp
- Baking soda 1/4 tsp
- Salt 1/2 tsp
- Butter 1/2 cup
- Caster sugar 1/2 cup (I reduced to 1/3 cup)
- Brown sugar 1/2 cup (I reduced to 1/3 cup)
- Golden syrup 1 tbsp
- Egg 2
- Milk 1/2 cup


ส่วนผสม : เค้กคาราเมล

- แป้งเค้ก 1 ถ้วย
- ผงฟู 1/2 ช้อนชา
- เบกกิ้งโซดา 1/4 ช้อนชา
- เกลือป่น 1/2 ช้อนชา
- เนย 1/2 ถ้วย
- น้ำตาลทรายป่น 1/2 ถ้วย (เจ้าของบล็อกลดเป็น 1/3 ถ้วยจ้า)
- น้ำตาลทรายแดง 1/2 ถ้วย (อันนี้เจ้าของบล็อกก็ลดเป็น 1/3 เช่นกันเด้อ)
- น้ำเชื่อมโกลเด้นไซรัป 1 ช้อนโต๊ะ
- ไข่ไก่ 2 ฟอง
- นม 1/2 ถ้วย


Directions : Caramel cake

- Sifting flour, baking powder, baking soda and salt together.
- Creaming butter then add caster sugar until fluffy (about 5 mins), add brown sugar beat until getting pale brown. Add egg one at a time, add golden syrup beat well.
- Gradually add flour mixture using rubber spatula, add some milk and mix together. Repeat this process until you don't have any flour mixture / milk left.
- Fill the batter in cake pan. Leave about 4 mm. above the batter to rise. Bake for 20 mins. Wait for 3 mins before you get the cake out of the tin. Cool cake on wire rack before serving with caramel sauce.


วิธีทำ : เค้กคาราเมล

- ร่อนแป้ง ผงฟู เบกกิ้งโซดา และเกลือด้วยกัน 1 ครั้ง
- ตีเนยที่พักไว้จนมีอุณหภูมิเท่ากับอุณหภูมิห้องให้ขึ้นฟู เติมน้ำตาลทรายป่นลงไปครึ่งถ้วย ตีด้วยที่ตีไข่ไฟฟ้าจนเป็นครีมฟู (ราว 5 นาที) ใส่น้ำตาลทรายแดงลงไป ตีจนได้ครีมสีน้ำตาลอ่อนๆ ใส่ไข่ไก่ลงไปครั้งละฟอง ตีให้เข้ากันก่อนใส่อีกฟองลงไป เมื่อเข้ากันดีแล้วใส่น้ำเชื่อมลงไป ตีจนเข้ากันดี
- ใส่ส่วนผสมแป้งลงไปทีละน้อย คนให้เข้ากันด้วยพายยาง แบ่งส่วนผสมนมใส่ลงไปส่วนหนึ่ง คนให้เข้ากัน ทำสลับเช่นนี้จนกระทั่งหมดส่วนผสมแป้งและนม
- ตักส่วนผสมที่คนจนได้ที่ลงในพิมพ์ ใส่ส่วนผสมให้ต่ำจากขอบพิมพ์ราว 4 มิลลิเมตร ขนมจะฟูขึ้นมาพอดีขอบ (ต่ำกว่านี้ก็ได้นะคะ เจ้าของบล็อกใส่ต่ำกว่า 1 เซนฯ ยังฟูล้นเลยค่ะ หรือเป็นเพราะพิมพ์เล็กก็ไม่แน่ใจ) นำเข้าเตาอบนาน 20 นาที ทดสอบโดยใช้ไม้จิ้มลงกลางเค้ก ถ้าไม่มีเศษขนมเหลวๆติดมาเป็นใช้ได้ นำออกจากเตาแล้วพักไว้ราว 3 นาที นำออกจากพิมพ์ พักไว้บนตะแกรงให้เย็นก่อนราดด้วยซอสคาราเมล


Ingredients : Caramel sauce

- Butter 8 tsp
- Brown sugar 2/3 cup (I reduced to 1/3 cup)
- Sugar 2/3 cup (I reduced to 1/3 cup)
- Salt 1 tsp
- Water 2 tbsp
- Golden syrup 3/4 cup (I reduced to 1/4 cup)
- Whipping cream 3/4 cup (I reduced to 1/2 cup)


ส่วนผสม : ซอสคาราเมล

- เนยจืด 8 ช้อนชา
- น้ำตาลทรายแดง 2/3 ถ้วย (เจ้าของบล็อกลดเหลือ 1/3 ถ้วยอีกแล้วค่ะ)
- น้ำตาลทรายขาว 2/3 ถ้วย (ลดเป็น 1/3 ถ้วยเหมียนเดิมจ้า)
- เกลือป่น 1 ช้อนชา
- น้ำ 2 ช้อนโต๊ะ
- โกลเด้นไซรัป 3/4 ถ้วย (ถ้าใส่หมดเกรงว่าจะเป็นเบาหวานก่อนกินเค้กหมดชิ้น ขอลดเหลือ 1/3 ถ้วยนะจ๊ะ)
- วิปปิ้งครีม 3/4 ถ้วย (อันนี้ลดเหลือ 1/2 ถ้วยจ้ะ ตามสัดส่วนของส่วนผสมอื่นๆที่ลดไป)


Directions : Caramel sauce

- Put butter in the saucepan add both kind of sugar, salt, water, and golden syrup. Bring all ingredients to boil and dissolve. Simmer about 3 mins stir with wooden spoon.
- Slowly add whipping cream. Be careful of heat and steam. Stir. Leave to cool.


วิธีทำ : ซอสคาราเมล

- ใส่เนยลงในหม้อเคลือบ ใส่น้ำตาลทั้ง 2 ชนิดลงไปพร้อมทั้งเกลือป่น น้ำ และน้ำเชื่อม เร่งไฟให้แรง คนไปเรื่อยๆจนน้ำเชื่อมเดือด และส่วนผสมทั้งหมดละลายเข้ากันดี ตั้งส่วนผสมไว้ให้เดือดปุดๆ ประมาณ 3 นาที (อย่าให้เดือดพล่าน) โดยราไฟลงเป็นไฟกลาง ระหว่างนั้นให้คนด้วยพายไม้ ยกหม้อลง หรือดับไฟที่เตา
- รินวิปปิ้งครีมลงไปช้าๆ (ไม่ต้องตีก่อน) ระวังควันและไอร้อนที่พวยพุ่งขึ้นมา ใช้ช้อนไม้ที่มีด้ามยาวคนอย่างเร็ว ขณะเดียวกันก็รินครีมลงไปเรื่อยๆ คนจนเข้ากันดี พักให้เย็นแล้วเก็บไว้ในตู้เย็น ถ้าเหลือใช้ราดไอศครีม ขนามหวาน หรือวาฟเฟิลก็ได้

Enjoy :)

Friday, March 25, 2011

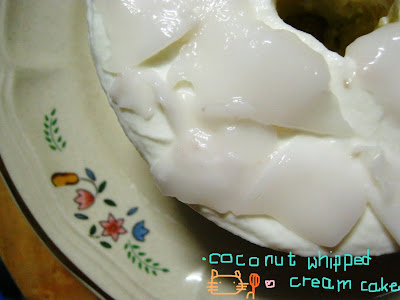
・Coconut whipped cream cake ・

I have mentioned about Summer fruits in previous entry and another of my favourite is ... coconut. ;9
Especially when you have chilled coconut water in the summer day. You will feel like you are in heaven.
A mild sweet and nice aroma. Ummm...By the way, I heard that coconut is IN for hollywood right now.
Because it contains a lot of Estrogen hormone and it's make your skin radient.
So.. if you are the health concious ones and still want to have some sweets, I think this menu suits you.

This recipe I have made it many times because everyone (my family, my bf's family, my colleages, my friends, ..) love it.
Young coconut is the universal fruit for everyone (especially seniors those don't like
ingredients those strange to the place they belong).
And the whipped cream make this cake lighter than other butter frosted cake.


เอ็นทรี่ที่แล้วได้พูดถึงผลไม้หน้าร้อนไว้ค่ะ ซึ่งเราก็ได้เอามะม่วงมาทำเป็น Cheesecake
อร่อยจริงๆนะเออ อย่าลืมลองทำกันดูนะจ๊ะ
มาวันนี้ก็เป็นผลไม้หน้าร้อนของโปรดอีกอย่างของเจ้าของบล็อกค่ะ นั่นก็คือ แท่นแท้นนนน มะพร้าวนั่นเอง
เอาจริงๆเจ้าของบล็อกก็ไม่ค่อยแน่ใจนะคะ ว่าไอ้เจ้ามะพร้าวเนี่ยมันเป็นผลไม้ฤดูไหนกันแน่ เพราะก็เห็นว่ามันนก็มีขายตลอดทั้งปีน่ะค่ะ
แต่เวลาที่เรากินในวันที่อากาศร้อนๆเนี่ย มันชื่นใจสุดๆไปเลย เจ้าของบล็อกก็เลยขอจับมาเป็นผลไม้หน้าร้อนแล้วกันเนอะ (เหตุผลอะไรของหล่อนยะ -_ -')
บายเดอะเวย์ ตอนนี้ที่ฮอลลีวูดเค้าก็กำลังฮิตกันสุดๆ เพราะว่ามะพร้าวเนี่ย มีฮอร์โมนเอสโตรเจน ช่วยให้ผิวพรรณเปล่งปลั่งใสกิ๊งค่า
รู้อย่างนี้แล้ว สาวๆที่รักสวย แต่ก็ยังอยากกินของหวาน มาลองทำเค้กมะพร้าวอ่อนกันดีกว่านะจ๊ะ
มาว่ากันที่เค้กดีกว่า เค้กนี้เป็นเค้กที่ที่บ้าน และบ้านคุณแฟนโปรดมากค่ะ
เพราะว่าเป็นมะพร้าวที่ทานได้ทุกเพศทุกวัย โดยเฉพาะผู้ใหญ่ ชอบมากค่ะ
แล้วก็แต่งหน้าด้วยวิปครีมทำให้เป็นเค้กที่ไม่หนักเกินไป
แถมน้ำมะพร้าวที่ใส่ในวิปครีมก็ช่วยให้หอม แล้วก็ทำให้เค้กกลายเป็นเค้กมะพร้าวววว มะพร้าวมากเลยค่ะ
สำหรับชาวไทย ตามไปเอาสูตรที่ลิงค์นี้เลยค่า เค้กมะพร้าวอ่อนครีมสด สูตรต้นตำรับ ของคุณเช้าค่ะ
ขอขอบคุณคุณเช้ามาณ ที่นี้นะคะ


・Coconut whipped cream cake ・
This recipe yield 2 lb. cake or about 30 mini cupcakes


Ingredient

Pandanus Chiffon

Part A: Cake flour 90 grams, Baking powder 1/2 teaspoon, Salt 1/4 teaspoon

Part B: Caster sugar 80 grams, coconut milk 40 grams, water 25 grams (I substitute with coconut juice), 3 egg yolk, oil 33 grams, pandanus aroma 1 teaspoon

Part C: Sugar 35 grams, 3 egg whites, a drop of lemon juice/a sprinkle of cream of tartar


Coconut whipped cream

Part A: Whipping cream 2 cups, icing sugar 1/2 cup (adjust as you like) it'll be less sweet when you add coconut juice

Part B: Coconut juice 1/3 cup, Gelatin 1 sheet, coconut juice 1/4 cup

Plus coconut to decorate

Directions

Pandanus Chiffon

1. Preheat oven at 180 C, Line paper sheet in the bottom of cake tin.

2. Sifting Part A together 3 times.

3. Gently stir Part B together.

4. Beating egg whites and sugar until it gots medium peak (the peak of egg white is bending down a little).

5. Quickly and gently combine Part A and Part B together.

6. Divide 1/3 of egg white and fold in other ingredient until well mixed and then fold in the rest.

7. Pour batter to cake tin. Bake for 25-30 minutes or until the cake spring back when touched or sharp knife inserted comes out clean.

Coconut whipped cream

1. Soak gelatin in coconut juice and put in microwave to melt add remaining coconut juice, wait until it's in room tempurature.

2 Beat whipping cream in freezed bowl until it got stiff peak and gently fold the gelatin part.

Enjoy :)


วันนี้ลาไปด้วยรูปลูกชายค่ะ สีทองง่วงแล้วววว

Thursday, September 23, 2010

・Project Cookbook ・

I have made many cooking and baking this month because I made a pact to myself that I have to choose recipe from my (many) cookbooks first if I want to do cooking.
And I like that because many of them are getting my interest only in the first day that I bought it but then
when I plan to cook, I tend to look for other source while buying new one all the time. :b

So, this is quite a cookbook project and these are savoury and sweets that I have made from my own cookbook. Gee.. I'm so proud of myself. Haha..


I will post the recipe soon one after another.
Stay tune. :)

Sunday, September 12, 2010

・Suzy's cake ・

Last Thursday I just made one dessert that came from the book that I ordered via Amazon.
(Thank you Noto for your kind shipping the book to me. :D)
I got this recipe from Chocolate desserts by Pierre Herme.


I have to admit that this cake have the most rich, melt-in-the-mouth texture and so chocolaty I ever had.
While the direction is so simple and the ingredients is not much and not hard to find.
I couldn't agree more about using the best chocolate you can find, and you will get the spectacular result.

In the recipe, He suggested Valrhona chocolate is the best choice but since I can't find it here so other will do. But make sure that you choosing the best, I insist.
And I'm quite sure that I will have a second try on this recipe soon with a twist by adding raspberries along with the batter. (As suggested in the book)


・Suzy's cake ・
Makes 8-10 servings


Ingredients
・250 grams bittersweet chocolate (70.5% cacoa)

・250 grams unsalted butter, at room temperature
2oo grams sugar
・4 large eggs, at room temperature (60 grams each)
・70 grams all-purpose flour

plus extra butter and flour for cake pan

Direction
・Center a rack in the oven and preheat the oven to 350 degree Fahrenheit (180 degree Celsius) Butter a 9-inch (24-cm) round cake pan that is at lease 2 inches (5 cm) high, line the bottom with parchment paper, butter the paper, and dust the inside of the pan with flour; tap excess and set the pan aside.

・Place a chocolate in a heatproof bowl over - not touching - simmering water and beat until the chocolate is melted; or melt chocolate in a microwave oven. Set chocolate aside to cool; it should feel only just warm to the touch when you mix it with the rest of the ingredients.

・Put the butter and sugar on the bowl of a mixer fitted with the paddle attachment and beat on medium speed for about 4 minutes, scraping down the side of the bowl frequently, until the butter is creamy and the sugar will blended into it. Add the eggs one at a time, beating for about one minute after each addition. Reduce the mixer speed to low, pour in the cooled chocolate, and mix just until it is incorporated. With the mixer still on low, add the flour and mix only until it disappears into the batter. Alternatively, you can fold in the last of the flour with a rubber spatula. You will have a thick, smooth, satiny batter that looks like old-fashioned chocolate frosting.

・Scrap the batter into the pan, smooth the top, and slide the pan into the oven. Bake for 26-29 minutes. (I use only 15), or until the cake rises slightly and the top has lost it sheen. The top may crack a bit and the cake may not look entirely set in the center, when you test the cake by inserting a slender knife into the center, the knife will come out slightly streak with batter, which is what you want. Transfer the cake to a rack to cool.

・When the cake has cooled, chill it in the refrigerator for an hour or two to make it easy to unmold. Turn the cake out, remove the parchment, and invert the cake onto a serving platter so this is right side up. Allow the cake to come to room temperature before slicing and serving.

・Better serve with ginger ice cream, lightly sweetened whipped cream or vanilla creme anglaise.

Enjoy :)