Saturday, December 25, 2010

The Daring Cooks December 2010 Challenge: Poach to Perfection!

Jenn and Jill have challenged The Daring Cooks to learn to perfect the technique of poaching an egg. They chose Eggs Benedict recipe from Alton Brown, Oeufs en Meurette from Cooking with Wine by Anne Willan, and Homemade Sundried Tomato & Pine Nut Seitan Sausages (poached) courtesy of Trudy of Veggie num num.

I haven't try to poach egg before and I thought it would be not so difficult.
I saw it many times in (cooking) comics and it's seems really easy. (Just throw eggs into water) And after I have join this challenge, I realize that, of course , it has to be that easy because they are not in real life. :D

And now it's time to show my (un)perfect poach. Haha...


I decided to combine my poached egg with spaghetti again.
And this time it's quite different because this spaghetti is sweet.
It might feel strange at the first time but I think the taste is smoother along the way.

Again, I used recipe from my favorite "Pasta Pasta" book.


Pasta with poached egg, mozzarella, and tomato.

Ingredients

Capellini 50 grams
Boiling water 1.5 Liter
Salt 1 tablespoon
(Synthesis salt 2/3 tablespoon)

Mozzarella 30 grams
Ripe tomato 1
Basil 4-5 leaves

A ingredients
Olive oil 1 tablespoon
Sugar 1 tablespoon
Salt 1/4 teaspoon
Pepper to taste

Olive oil 2 tablespoons
Poached egg 1
Pepper to taste


Direction:

I. Poach egg

Ingredients
Eggs (size is your choice)
Splash of vinegar (for poaching)
  • Add salt and a splash of vinegar (any kind will do). I added about a tablespoon of vinegar to my small saucepan (about 3 cups of water/720 ml of water), but you may need more if you’re using a larger pan with more water.
  • Crack eggs directly into the very gently simmering water (or crack first into a bowl and gently drop into the water), making sure they’re separated. Cook for 3 minutes for a viscous but still runny yolk.

In this book, it also suggest another way to poach egg by using instant noodle cup by put egg (with shell) in the cup. Pouring hot water about 8 part of the cup, cover with foil and wait for 25 minutes.
But I didn't try this method because I don't have any instant noodle cup. But I think I should keep some to make this experiment next time.

II. Spaghetti

  • Rubbing mozzarella and knead it to square shape size 1.5 c.m. Cut tomato into square shape size 1 c.m. Leave core and seeds. Coarsely chop basil and combine all 3 ingredients with A ingredients. Stir.
  • Put salt in boiling water, break half of capellini and put it in the pot.
    Boil as long as suggested and bring to cold water. Drain.
  • Combining cooked capellini with olive oil and mix with mozzarella mixture in the first bullet. Mix well.
  • Bring to plate. Put poached egg on top. Serve.
Enjoy :)

Wednesday, December 8, 2010

・Spaghetti Basil Sauce ・

Another of my "Home alone" breakfast that I would like to introduce is "Spaghetti Basil Sauce".
I tend to cook many of spaghetti dishes because it is quick and easy.
Especially when I have this book - Pasta Pasta. That I already introduced here.


As I said, most of the recipes in this book require only a bowl and microwave.
And what I like most is it does not ask for many ingredients for each dish and because of less seasoning, so the taste and aroma will reflect the quality of ingredients that you use.

Let's get started.


・Spaghetti Basil Sauce ・
1 servings


Ingredients

Spaghetti 100 grams
Boiling water 1.5 Liter
Salt 1 tablespoon
(Synthesis salt 2/3 tablespoon)

Basil sauce
Basil 1 pack (20 grams)
Sliced garlic 2 cloves
Sliced red chili 1
Olive oil 1 tablespoon
Grinned white sesame 1 tablespoon
Salt 1/4 teaspoon
(Synthesis salt - use a pinch)
Pepper to taste


1. Divide basil, chop and leave some for decoration.
2. Put salt in boiling water, break half of spaghetti and put it in the pot.
Boil as long as suggested .
3. Prepare heatproof bowl mix basil, garlic, red chili, olive oil.
Wrap with a little open at the edge. Bring to microwave (600 watts) for 1.30 min.
4. Take the bowl out of the microwave, open (BE CAREFUL OF THE HEAT!!),
add grinned white sesame, salt, and pepper. Stir.
5. Mix sauce mixture with cooked spaghetti. Decorate with basil.


Enjoy :)

Friday, December 3, 2010

・Sophie Dahl's Omelette Arnold Bennett ・

Hi! everyone.

Since this week I'm alone in the house.
So I don't have pre-packed breakfast from my mom and I have to make it myself.
Sometimes I quite jealous those who can drink only coffee and count that as their breakfast.
It looks so easy, compare to me that have to eat a big meal breakfast.

But once you start eating a real meal on your breakfast, you can't turn back to your "coffee only" breakfast again.
You will be super starving and won't have any energy to do things.
(Am I too dramatize ? ;b)

Another shameful reason is that my stomach is a super grumpy one. If you don't feed it on time, it will rumbling like it says "Feed me... feed meeee......". LOL LOL
It's sound is super loud and will increasing the volume until I feed it.

And because I have to take care of everything before I leave the house, feeding cats, dogs, and fish, I have to choose less complicated and quickly prepared recipe.

And I found this,


What I love about the recipe is all ingredients are basic ingredients that most kitchens already has plus the procedure that is quick and easy.
I did adjust a little by adding cooked rice to help me survive until noon. (As I said, I need a BIG meal breakfast. :) )
And because I didn't have creme fraishe so I made it up by adding yogurt into whipping cream. Here is the direction. (Thanks to khun Pook from Dailydelicious. :) )

Now... my failure's turn, see .. even the easiest recipe, I still made mistake.
How incredible I am. LOL LOL

I bring the omelette out of the oven too soon and the egg still raw. - -'

But it is easy to fix, I just put it back in the oven. Haha..
And I garuntee that the taste is still good.
I think this is a great combination like Miss Dahl said; Parmesan, eggs, and fish these ingredients brings a spectacular taste and aroma. Ummm... :9


And this is Lamewliving's version of Omeltte Arnold Bennett.


Tada !!


Yum. :)

Saturday, November 27, 2010

The Daring Cooks November, 2010 Challenge: RISE AND SHINE!

Dave and Linda from Monkeyshines in the Kitchen chose Soufflés as our November 2010 Daring Cooks’ Challenge! Dave and Linda provided two of their own delicious recipes plus a sinfully decadent chocolate soufflé recipe adapted from Gordon Ramsay’s recipe found at the BBC Good Food website.

I chose chocolate souffle for this month's challenge.
It is quite exciting to watch souffle risen in the oven.
It dramatically rose in my oven and also fall in light speed. Haha..
So I agree with Dave and Linda that the hardest part of this challenge is taking photo, you should prepare the set before hand and get ready to take photo as soon as souffle is out of the oven.

As you can see from my picture that some of my souffles are already fall. :b


Ingredients

FOR THE DISHES

2 Tbsp (30 ml) 1 oz (30g) unsalted butter, for greasing
Cocoa powder or finely grated chocolate

FOR THE CREME PATISSERIE

2 tbsp (30 ml) (18 gm) (2/3 oz) plain (all-purpose) flour
2 tsp (10 gm) (0.35 oz) caster (superfine) sugar (regular sugar is OK)
½ tsp (4½ gm) (0.15 oz) corn starch (aka cornflour)
1 medium egg yolk
1 medium whole egg
4 Tbsp (60 ml) milk

5 Tbsp (75 ml) heavy cream (or double cream)
3 oz (90gm) good-quality dark chocolate preferably 70+% cocoa solids, broken in pieces
2 Tbsp (30 ml) (15 gm) (½ oz) unsweetened cocoa powder
Optional:
2 tsp orange zest or 2 tsp minced chipotle chile en adobo or 1 tsp chipotle chile powder. (I used chile version but mine is Hungary paprika)

Optional: powdered sugar for dusting


FOR THE EGG WHITES

6 medium egg whites

6½ Tbsp (95 ml) 3 oz (90g) superfine/caster sugar (if you don’t have it, regular sugar is OK)


Directions:

1. Heat oven to moderate 375 ˚F/190 ˚C/gas mark 5.
2. Take four 1 cup/~240ml soufflé dishes and brush them completely with softened butter. Tip a little cocoa powder or grated chocolate into each dish, roll the dish around tilting it as you do so it is evenly lined all round.

3. For the crème patisserie, mix the flour, sugar and corn starch into a small bowl. Put egg yolk and whole egg into a medium sized bowl, beat lightly, then beat in half of the flour mixture to give a smooth paste. Tip in the rest of the flour mixture and cocoa powder and mix well.
4. To make the ganache, pour the milk and cream into a pan and bring just to the boil. Remove from the heat. Add the chocolate and beat until it is melted and smooth with no lumps.
5. Gradually stir hot chocolate ganache into the paste from step 3, and add the orange zest or chile if using. This is your crème patisserie.
6. Whisk the egg whites to soft peaks with an electric whisk. Sprinkle in the sugar as you are mixing. Keep whisking to give stiff, firm peaks to give volume to the soufflés.
7. Stir about 2 tbsp (30 ml) of the beaten egg whites into the crème patisserie. Carefully fold in a third of the rest, cutting through the mixture. Fold in another third (take care not to lose the volume), then fold in the rest.
8. Spoon the mixture into the dishes. Run a spoon across the top of each dish so the mixture is completely flat. Take a little time to wipe any splashes off the outside of each dish, or they will burn on while cooking.
9. Bake the soufflés for 15-17 minutes.
10. The soufflés should have risen by about two thirds of their original height and jiggle when moved, but be set on top.


Taste is good, not so sweet, and a bit of paprika aroma makes it more special.

Anyways, thank you Dave and Linda for this amuse challenge and couldn't agree more with the words of James Beard: "The only thing that will make a soufflé fall is if it knows you are afraid of it". :)

NOVEMBER 2010 DARING BAKER CHALLENGE: CROSTATA!

The 2010 November Daring Bakers’ challenge was hosted by Simona of briciole. She chose to challenge Daring Bakers’ to make pasta frolla for a crostata. She used her own experience as a source, as well as information from Pellegrino Artusi’s Science in the Kitchen and the Art of Eating Well.

And all I have to say is thank you Simona, you introduce me a delicious sweet with a good and easy recipe.

But even the recipe is good and easy, I still make some mistake. - -'
I choose fresh raspberry to be crostata filling but I forgot to think that there will be too much moisture after bake and I didn't taste the raspberry first and the result is that I got a super sour crostata. Maybe I should call it a "Wake me up crostata". Haha...


Super sour raspberry crostata!


But as I say, the recipe is great and the pasta frolla is so good. So I did it again, this time I change the filling to blackberry jam and another one is filled with nutella and topped with slice almond. And the result is great. Let's take a look :)


Better blackberry crostatine.


Yum nutella almond crostatine.


Making pasta frolla - I choose to make it by hand.

Ingredients:
  • 1/2 c. minus 1 tablespoon [105 ml, 100 g, 3 ½ oz] superfine sugar (see Note 1) or a scant 3/4 cup [180ml, 90g, 3 oz] of powdered sugar
  • 1 and 3/4 cup [420 ml, 235 g, 8 1/4 oz.] unbleached all-purpose flour
  • a pinch of salt
  • 1 stick [8 tablespoons / 4 oz. / 115 g] cold unsalted butter, cut into small pieces
  • grated zest of half a lemon
  • 1 large egg and 1 large egg yolk, lightly beaten in a small bowl

Making pasta frolla by hand:

  1. Whisk together sugar, flour and salt in a bowl.
  2. Rub or cut the butter into the flour until the mixture has the consistency of coarse crumbs. You can do this in the bowl or on your work surface, using your fingertips or an implement of choice.
  3. Make a well in the center of the mounded flour and butter mixture and pour the beaten eggs into it (reserve about a teaspoon of the egg mixture for glazing purposes later on – place in the refrigerator, covered, until ready to use).
  4. Add the lemon zest to your flour/butter/egg mixture.
  5. Use a fork to incorporate the liquid into the solid ingredients, and then use your fingertips.
  6. Knead lightly just until the dough comes together into a ball.
  7. Shape the dough into a flat disk and wrap in plastic wrap. Place the dough in the refrigerator and chill for at least two hours. You can refrigerate the dough overnight.

Assembling and baking the crostata di marmellata:
  1. Heat the oven to 375ºF [190ºC/gas mark 5].
  2. Take the pasta frolla out of the fridge, unwrap it and cut away ¼ of the dough. Reserve this dough to make the lattice top of the crostata. Refrigerate this dough while you work on the tart base.
  3. To help roll the crostata dough, keep the dough on top of the plastic wrap that you had it wrapped in. This can help rolling the dough and can also help when transferring the dough to your pan. You can also use parchment paper for this. However, you can also roll the dough directly on a work surface if you prefer.
  4. Lightly dust the top of the dough and your work surface (if you’re rolling directly on a work surface) with flour. Keep some flour handy to dust the dough as you go along.
  5. If the dough is very firm, start by pressing the dough with the rolling pin from the middle to each end, moving the rolling pin by a pin's width each time; turn the dough 180 degrees and repeat; when it softens, start rolling.
  6. Roll the dough into a circle about 1/8th inch (3 mm) thick.
  7. If you used the plastic wrap or parchment paper as rolling surface, flip dough over the pan, centering it, and delicately press it all around so the corners are well covered. Peel away the plastic wrap.
  8. Trim the excess dough hanging over the edges of the pan. Press the remaining dough around the border into the sides of the pan making sure the border is an even thickness all the way around.
  9. Prick the bottom of the dough with a fork in several places.
  10. Take out of the fridge the reserved pasta frolla you had cut away earlier. Roll it with your pin and cut into strips or use cookie cutters to make small shapes (this is not traditional, but it looks cute); or roll with your hands into ropes.
  11. Spread the jam or fruit preserves evenly over the bottom of the crostata.
  12. Use the prepared strips or rolls of dough to make a lattice over the surface, or decorate with the cut shapes. (Note: You can use dough scraps to make cookies: see the Additional Information section for some pointers)
  13. Brush the border and strips of dough with the reserved beaten eggs. You can add a drop or two of water to the beaten eggs if you don’t have enough liquid.
  14. Put the tart in the oven and bake for 25 minutes.
  15. After 25 minutes, check the tart and continue baking until the tart is of a nice golden hue. (Note: Every oven is different. In my oven it took 34 minutes to bake the tart until golden.)
  16. When done, remove the tart from the oven and let cool. If you have used a tart pan with a removable bottom, then release the tart base from the fluted tart ring. Make sure the tart is completely cool before slicing and serving.
I think we should make pasta frolla ahead and freeze it, so we will have crostata at anytime we want because it is good with many style fillings.
Next time I think I will try making a savory crostata.

Thanks again Simona. :)

Thursday, October 21, 2010

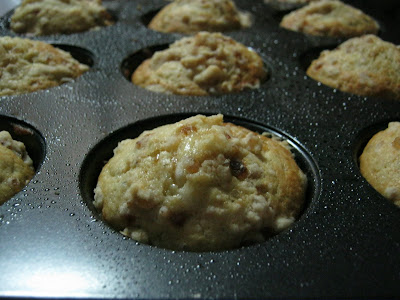
・Project Cookbook ・Banana Streusel Muffins

This is difference from our Thai traditional banana cakes those are quite wet and having a sticky surface.
I love the crunchy texture that comes from walnuts and streusel on top. And the softness that develops from adding buttermilk in the batter.

This recipe is from The Sono Baking Company Cookbook.


・Banana Streusel Muffins ・
Makes 12 muffins


Streusel Topping
・1/4 cup all -purpose flour
・1/2 cup light brown sugar
・1/4 teaspoon coarse salt
・1/8 teaspoon ground cinnamon
・1/4 cup cold unsalted butter, cut into small cubes

Muffin
・2 cups all-purpose flour
・1 teaspoon baking powder
・1 teaspoon baking soda
1/2 cup unsalted butter, at room temperature
・1 cup granulated sugar
・1 1/2 teaspoon coarse salt
・2 large eggs, at room temperature
・2 teaspoons pure vanilla extract
・3 very ripe bananas
・1/2 cup buttermilk, sour cream, or whole-milk yogurt
・1 1/2 cup whole walnuts, chopped (optional)


To make the streusel topping

・In a medium bowl, use a fork to stir together the flour, brown sugar, salt, and cinnamon. Add the cubes of butter, and using your fingertips, work it into the dry ingredients until pea-size crumbs form: set aside in the refrigerator.

・Set the oven rack in the middle position. Preheat the oven to 375 degree Fahrenheit. Spray a standard 12-cup muffin pan with non stick oil cooking spray, or generously butter with soften butter; set aside.


To make the muffin
In a medium bowl, whisk together the flour, baking powder, and baking soda; set aside.

・In the bowl of a standing mixture fitted with the paddle attachment, beat the butter, sugar, and salt on medium-high speed until light and fluffy, 2-3 minutes, scraping down the side of the bowl halfway through. Add the eggs one at a time, beating after each addition. Then add in and beat the vanilla and the bananas.

・With the mixture on low speed, add the dry ingredients, beating until the flour absorbed. Beat in the buttermilk. Fold in the walnuts, if using.

・Use a 2-inch (1/4 cup) ice cream scoop to divide the batter evenly among the prepared muffin cups. Sprinkle the streusel topping over the muffin, pressing some of the mixture into pea-size clumps with your fingertips, for adding texture.

・Bake, rotating the pan about two-thirds of the way through the baking time, until the top of the muffins spring back when touched and a caked tester inserted in the center of a muffin comes out clean, 18-22 minutes.

・Transfer the pan to a wire rack to cool for 10 minutes. Use a small offset spatula or a table knife to gently lift and turn the muffins on their sides in the muffin cups. Let cool completely in the pan.

:)

Saturday, October 16, 2010

・Project Cookbook ・Raspberry Swirl Cheesecake Cupcakes

I recommend you to use a removable bottom pan.
And be careful when you pouring the sauce not to get too close to the edge because the sauce is very sticky and it's become pain in the ass when you try to get the cake of the tin and finally you will get a destroyed cake like me.
But about the taste is so good and tender.
Recipe is from this book, again.
So.. let's try.


・Raspberry Swirl Cheesecake Cupcakes ・
Makes 10-12 cupcakes


Ingredients
・70 grams digestive biscuit
・15 grams unsalted butter
・1 eggs (size 0 or 1, 65-75 grams each)
・175 grams sugar
・75 grams raspberry
・400 grams creamcheese (I think we should decrease the amount of this ingredient because I have so much left over T . T)
・little salt
・1/2 teaspoon vanilla

Direction
・Preheat your oven at 160 degree celcius put cupcake cups in 12-holes muffin pan.

・Combine crushed digestive biscuit with melted butter. Scoop in muffin pan, 1 tablespoon at a time. Press tight.

・Bake for 5 minutes, leave it to cool.

・Blending raspberry until smooth. Sieve through strainer. Add 2 tablespoon sugar in raspberry sauce. Stir.

・Beat creamcheese untill smooth add remaining sugar beat until well blended. Add egg, salt and vanilla beat together.

Divide into each muffin pan. Drop each with 2-3 teaspoons raspberry sauce. Use toothpick or fork to make swirl.

・Bake until stable about 15-20 minutes. Leave to cool in the pan. Put in fridge about 1 hour before serve.

:)

Monday, October 4, 2010

・Project Cookbook ・Pasta Lasagna

When I though of pasta, I always end up with this book.


Because of its easy to make recipe (almost all recipes use only microwave to cook - except boiling pasta) and most of them taste good. (But some are taste too light for me.)
I've try this recipe before but the result is not quite impressive because I produce too much sauce and make the pasta too wet even I already baked it.
So, this time I reduce milk from the recipe and now it's to dry. Haha...
But overall taste is good so I think I should post this one.

Pasta Lasagna
1 Serving


Ingredients
・50 grams pipette
・1.5 liter boiling water
・1 tablespoon coarse salt

Tomato sauce with bacon
・50 grams tomato sauce
・1 piece bacon
・1 tablespoon fine chopped onion

White sauce
・1 tablespoon bread flour
・1 tablespoon butter
・150 ml. milk
・1/4 teaspoon coarse salt
・little pepper

1/2 teaspoon grated Parmigiano
・little parsley

Direction
・Add salt in boiling water adding pipette, boil in specify time.
・Cut bacon into 1 cm length. Put it in heat proof bowl with tomato sauce and onion. Close with plastic wrap. Put the bowl in microwave about 1.30 min. Stir.
・Making white sauce by adding bread flour and butter in heatproof bowl size 22 c.m. diameter. Close lid or use film wrap with a little open at the edge Put in microwave (600 watts) about 1.30 min stir with whisk. Adding milk little by little until the texture become like cream, add salt and pepper. Close lid or use film wrap with a little open at the edge Put in microwave (600 watts) again about 2 min. Stir and then put in microwave for another 1 min. Stir.
・Brush butter in the heatproof plate. Pour half of white sauce then add first half of boiled pipette. Pour tomato sauce in with another half of pipette following with remaining white cream. Sprinkle with cheese and parsley.
・Baking in 230 degree Celsius oven about 10-12 min or until top surface of lasagna got light brown color.

Enjoy. :)

Wednesday, September 29, 2010

・Project Cookbook ・Orange and Almond Cupcakes

Actually I'm not so crave about orange. It is a kind of fruit that I sometimes avoid.
Because in Thailand orange skin is not thick so we have to peel them out first before eating.
That will make you fingers got yellow and have orangy smell for a long time.

Furthermore, I'm too lazy to split the orange seed out and sometimes I unintened chew orange seeds and that's worst. It's super bitter. :( yuck!

But my dad and others love orange so why not try this one.
Moreover, In this recipe, I don't have to peel the orange skin because we will simmer it in the pot, then blend it and mix with other ingredients.
That's so good. :)
And the taste is also good. You can feel the whole orange in your mouth with a moist texture of the cake
(I'm crazy about soft and moist cake) plus the tangy taste of the glaze. Perfecto!!

Back to the recipe, I'm quite surprise that this recipe does not contain any flour so I think it's safe for those who is allergic to gluten.
I use the recipe from this book, 10 Best Cupcakes & Muffins.


But I also found the similar recipe in this cookbook, too. Goodfood: 101 cakes and bake.
(This is another cake book that I like because its recipe is good, I will post recipes from this book too someday)
I haven't try the recipe from "Goodfood" because I saw that it requires more ingredients, so I choose the minimal one.
But I will surely try to compare these two recipes soon.

・Orange and Almond Cupcakes ・
Makes 10-12 cupcakes


Ingredients
・1 Sunkist orange
・30 grams unsalted butter
・3 eggs (size 0 or 1, 65-75 grams each)
・125 grams almond meal
・1 teaspoon baking powder
・100 grams sugar
(Actually the recipe didn't mention about sugar but I think it would be mistake so I add it in)

Orange glaze
・50 grams sugar
・30 ml. orange juice
・30 ml. water

Direction
・Put sunkist orange in the pot cover by water and boil then adjust fire to low and simmering without lid about 1 hr (you might have to add water along the way to make sure that it's not too dry) until soft. Bring seeds out and blend the orange in the blender along with its skin until you have fine puree.

・Preheat your oven at 160 degree celcius brushing butter in 12-holes muffin pan.

・Beating butter and sugar until light and fluffy. Put egg one after another beat until it's well blended before put another one.

・Pouring almond meal, baking powder and orange puree to the mixing bowl. Mix together.

・Fill the pan with batter, bake for 20-25 minutes until done.

To make orange glaze
Put sugar, orange juice and water in the pot, boiling and left it boil about 5-10 minutes until the glaze get thicker.

・Pouring orange glaze on the cake while it's still warm.


Hope you enjoy the recipe. :)

Thursday, September 23, 2010

・Project Cookbook ・

I have made many cooking and baking this month because I made a pact to myself that I have to choose recipe from my (many) cookbooks first if I want to do cooking.
And I like that because many of them are getting my interest only in the first day that I bought it but then
when I plan to cook, I tend to look for other source while buying new one all the time. :b

So, this is quite a cookbook project and these are savoury and sweets that I have made from my own cookbook. Gee.. I'm so proud of myself. Haha..


I will post the recipe soon one after another.
Stay tune. :)

Sunday, September 12, 2010

・Suzy's cake ・

Last Thursday I just made one dessert that came from the book that I ordered via Amazon.
(Thank you Noto for your kind shipping the book to me. :D)
I got this recipe from Chocolate desserts by Pierre Herme.


I have to admit that this cake have the most rich, melt-in-the-mouth texture and so chocolaty I ever had.
While the direction is so simple and the ingredients is not much and not hard to find.
I couldn't agree more about using the best chocolate you can find, and you will get the spectacular result.

In the recipe, He suggested Valrhona chocolate is the best choice but since I can't find it here so other will do. But make sure that you choosing the best, I insist.
And I'm quite sure that I will have a second try on this recipe soon with a twist by adding raspberries along with the batter. (As suggested in the book)


・Suzy's cake ・
Makes 8-10 servings


Ingredients
・250 grams bittersweet chocolate (70.5% cacoa)

・250 grams unsalted butter, at room temperature
2oo grams sugar
・4 large eggs, at room temperature (60 grams each)
・70 grams all-purpose flour

plus extra butter and flour for cake pan

Direction
・Center a rack in the oven and preheat the oven to 350 degree Fahrenheit (180 degree Celsius) Butter a 9-inch (24-cm) round cake pan that is at lease 2 inches (5 cm) high, line the bottom with parchment paper, butter the paper, and dust the inside of the pan with flour; tap excess and set the pan aside.

・Place a chocolate in a heatproof bowl over - not touching - simmering water and beat until the chocolate is melted; or melt chocolate in a microwave oven. Set chocolate aside to cool; it should feel only just warm to the touch when you mix it with the rest of the ingredients.

・Put the butter and sugar on the bowl of a mixer fitted with the paddle attachment and beat on medium speed for about 4 minutes, scraping down the side of the bowl frequently, until the butter is creamy and the sugar will blended into it. Add the eggs one at a time, beating for about one minute after each addition. Reduce the mixer speed to low, pour in the cooled chocolate, and mix just until it is incorporated. With the mixer still on low, add the flour and mix only until it disappears into the batter. Alternatively, you can fold in the last of the flour with a rubber spatula. You will have a thick, smooth, satiny batter that looks like old-fashioned chocolate frosting.

・Scrap the batter into the pan, smooth the top, and slide the pan into the oven. Bake for 26-29 minutes. (I use only 15), or until the cake rises slightly and the top has lost it sheen. The top may crack a bit and the cake may not look entirely set in the center, when you test the cake by inserting a slender knife into the center, the knife will come out slightly streak with batter, which is what you want. Transfer the cake to a rack to cool.

・When the cake has cooled, chill it in the refrigerator for an hour or two to make it easy to unmold. Turn the cake out, remove the parchment, and invert the cake onto a serving platter so this is right side up. Allow the cake to come to room temperature before slicing and serving.

・Better serve with ginger ice cream, lightly sweetened whipped cream or vanilla creme anglaise.

Enjoy :)

Wednesday, September 8, 2010

・Boo's update ・

หลังจากที่พาบูไปว่ายน้ำ ผลลัพธ์ช่างน่าอัศจรรย์
หมอเรียกมาดู film x-ray พบว่ากระดูกของบูติดกันเป็นแท่งเดียว ประหนึ่งว่าไม่เคยแตกละเอียดมาก่อน
หมอบอกว่าต่อไปนี้ไม่ต้องมาพบหมอแล้วนะคะ พ่อก็ดูท่าทางโล่งใจทันที (ก็มันแพงง่ะ)

แต่บังเอิ๊ญญญ
ก่อนออกจากบ้านดันเห็นว่าหูบูเป็นอะไรไม่รู้ ดูแห้งๆเป็นสะ
เก็ดสีเหลืองอยู่รอบๆ ก็เลยขอให้หมอช่วยตรวจหน่อย
หมอบอกว่าต้องย้ายไปตรวจชั้นหนึ่งนะจ๊ะ

เรากับพ่อก็เลยเคลื่อนขบวนไปต่อกันที่ชั้นหนึ่ง หมอจัดการแหย่หูด้วย cotton bud แล้วก็เอาสำลีถูบริเวณเท้าที่เป็นสีขาว (ที่ตอนนี้เป็นสีแดง เพราะกัดจนถลอกปอกเปิก)
รอผลประมาณ 10 นาที หมอก็บอกว่า

"ยีสต์เต็มหูเลยค่าาาา..."


เราก็เอ... ยีสต์นี่ใช่ที่เอาไว้ทำขนมปังรึเปล่าคะ?


เท่านั้นยังไม่พอ ที่ตัวก็มีแบคทีเรียเต็มเลย บูก็เลยคัน แล้วก็กัดๆๆเท้าตัวเองจนแดง
ซึ่งสาเหตุที่หูก็น่าจะมาจากน้ำเข้าไปขัง แล้วเราไม่ได้เช็ดออกให้หมด เชื้อโรคก็เลยเติบโตเป็นอาณาจักรอยู่ในหูเล็กๆของบู
(ส่วนสระมรกตก็อาจจะเป็นสาเหตุประกอบอีก 1 อย่าง ฮึ่ม...)

ลงท้ายที่วันนี้ได้ยามา 2 อย่าง + แชมพูฆ่าเชื้อ + ยาทำความสะอาดหู + ยาหยอดหูฆ่าเชื้อ
พ่อหมดไปอีก 1,200 กว่าบาท ฮือ.. ขอบคุณนะค้า...


กลับถึงบ้านก็ปฏิบัติภารกิจที่หมอได้ brief มา

เริ่มจากให้ทายาก่อนอาหาร --> จับบูมาล้างตัว -->ฟอกแชมพูบริเวณที่มีขนสีขาว คือเท้า 4 ข้าง กับหน้าอก (ขนสีขาวจะติดเชื้อ หรือแพ้ได้ง่ายกว่า) --> ทิ้งไว้ 5 นาที --> ล้างฟองออกให้สะอาด --> เช็ดตัว เป่าขน --> หยอดหูด้วยน้ำยาทำความสะอาด --> นวดๆๆ ที่กกหู --> ใช้ cotton bud ทำความสะอาด --> หยอดน้ำยาลงบนสำสี -->เช็ดใบหูให้ทั่ว --> หยอดยาฆ่าเชื้อในหูแล้วทิ้งไว้ --> ให้อาหาร --> รอซักพัก แล้วก็ตามด้วยยาหลังอาหารฮะ

ตอนแรกก็คิดว่า 15 นาทีคงเสร็จ ที่ไหนได้ ปาไปชั่วโมงนึง แฮ่กมาก.. รู้เลยว่า คนเป็นแม่นี่เค้าต้องทุ่มเทจริงๆนะเออ นี่ขนาดลูกเราเป็นหมายังเหนื่อยขนาดนี้เลย ต้องขอชื่นชมและซาบซึ้งในพระคุณของคุณแม่ทุกๆท่านจริงๆค่ะ (ไม่ได้ล้อเล่นนะเออ)

ปฏิบัติการนี้ต้องต่อเนื่องยาวนานถึง 2 อาทิตย์ จนบูขยาด Cotton bud เห็นปุ๊บหนีปั๊บเลยทีเดียว

ต้องอธิบายวิธีเช็ดหูนิดนึงนะคะ คือข้างในหูของหมาๆเนี่ย มันจะเป็นรูปตัว L ค่ะ กล่าวคือ ช่วงเส้นตรง I จะเป็นช่องที่น้ำสามารถลงไปขังได้ (เหมือนอย่างที่บูเป็น) แต่ส่วนของแก้วหูจะหักมุมอยู่ลึกเข้าไปในส่วนของหางตัว L ค่ะ ฉะนั้นเราสามารถยัด Cotton bud ลงไปแบบสุดๆได้เลย ไม่ต้องกลัวเจ็บนะคะ

แต่สำหรับบูที่ขยาดเนี่ย เพราะว่าบูจั๊กจี๊ค่ะ (หมอบอกมานะ เค้าไม่ได้คิดเอง) แล้วมันก็คงไม่เข้าใจความรู้สึกนี้อ่ะ ก็เลยดิ้นๆๆๆ ใหญ่เลย
มี 2 ครั้งที่ดิ้นจน Cotton bud หักคาหูอ่ะค่ะ อิเจ้าของก็กรี๊ดสิคะ กลัวเอาออกไม่ได้ บูก็หมุนๆๆๆ ใหญ่เลย ไม่ยอมให้จับหูเลย ดีว่ายังเหลือปลายไว้ให้ดึงออกค่ะ ไม่งั้นก็ต้องวิ่งไปหาหมออีก - ____-'

จนล่าสุดที่ไป update อาการกับคุณหมอ เราก็ได้กำจัดคุณยีสต์และแบคทีเรียออกไปหมดแล้วค่ะ
แต่ปัญหาคือผิวและขนที่ยังกระดำกระด่าง ที่คาดว่าน่าจะมาจากสาเหตุอื่น เช่นแพ้อาหาร
คุณหมอก็เลยต้องลองเปลี่ยนยาแก้คันใหม่ ให้ยาบำรุงขนเพิ่ม
ซึ่งถ้าอีก 2 อาทิตย์ไม่ดีขึ้น ก็ต้องมา test อาหารกันแล้วค่ะ รอบนี้หมดไปอีก 600 กว่าบาท
บูจ๋า สงสารแม่เท้อออออ... แม่จะหมดตัวแล้วลูกเอ้ยย

ลาไปด้วยภาพเซตพิเศษจากบูบูค่ะ

หมาตี๋ไม่เหมือนหมอตี๋นะจ๊ะ

นี่คือคุณชาร์ลีค่ะ เป็นแมวที่เป็นมิตรสุดๆ มีหนวดบนปากเหมือนชาร์ลี แชปปลินด้วยนะเออ

ดูตาสิคะ จะไม่รักยังไงไหว

มาวันธรรมดาเร็วกว่านะจ๊ะ (แต่กว่าจะเสร็จก็ 10 โมงฮะ)

ขากลับรอบนี้ดูจ๋อยมากค่ะ ไม่รู้ว่าเศร้าเรื่องอะไร

ขอบคุณทุกท่านที่ติดตามชม รวมถึงมิตรรักบูบูที่ค่อยถามไถ่อาการอยู่เสมอนะฮะ :)

Thursday, September 2, 2010

・Sable fish steak with wasabi sauce ・


After we've done many (?) of dessert,
now it's time for main dish.
Reason that I choose this recipe is because I did it for our (my bf & me) dinner and my bf is so crave about fish and wasabi.
Luckily that I have sable fish in my fridge but actually in the recipe they use salmon, so I think you can adjust as you wanted.
But I like the taste & moisture in this kind of fish that is differrent from salmon.
Because salmon tend to have more dry texture when it cooked.
I got this recipe from Health& Cuisine magazine, March 2010 issue.


So if you already got all ingredients, let get started.

・Sable fish steak with wasabi sauce ・
For 2 pax


Ingredient

Sable fish steak
Sable fish (or another) 2 pieces
Salt and pepper for seasoning
Olive oil (to fry fish)

Wasabi sauce
Fish stock 1 cup
Whipping cream 3 tablespoon
Unsalted butter 2+1/2 tablespoon
All purpose flour 2 tablespoon
Chopped onion 2 tablespoon
Wasabi cream 1 tablespoon
Ebiko 2 tablespoon

Direction
1. Put salt, pepper and olive oil on the fish, leaveit for a while.
2.Fry onion with butter on the low fire until soften put in all purpose flour, fish stock and wasabi boil until sauce get thicker. Strain through the sieve. Put sauce on fire again, add whipping cream and seasen with salt and pepper.
3. Fry fish in the pan with olive oil until done. Serve with wasabi sauce and ebiko.

Note
I found that cooking fish on a low heat you will get more satisfaction on the taste and the texture. I have done a little study and I found that when you cook on high heat even you will get the same result that you meat is cooked but the fiber and juice in the meat has been destroy by that mean. So I suggest that you should try this "slow cooked" thing and I think it will be worth trying. :)

Monday, August 23, 2010

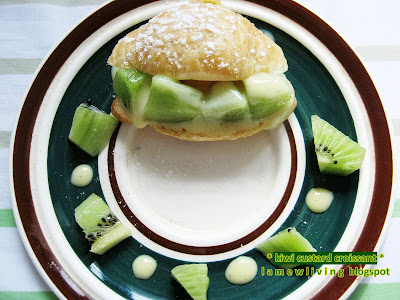
・kiwi custard croissant ・


Today I introduce a super easy sweets again.
(Because about 80% are instant ingredients :b)
This sweet called ・kiwi custard croissant ・
From the name, I think you guys can figure out about the composition. Those are kiwi + custard + croissant.

This sweet is for those who don't have the oven or who are too tired.
You just make the custard ahead and mix with any fruit you like.

Today's custard recipe is from the book below.
This book is full of simple recipe while looking so flavorful.
And as you see that it's a sweet that made from fruits so I think it leaves us less guilt while we eating them.


・kiwi custard croissant ・
Make 10 pieces


Ingredients
Kiwi
Mini Croissant 10 pieces
(Custard cream)
Egg yolk 3
Sugar 60 grams
Flour 30 grams
Vanilla bean
Milk 250 ml.

Direction
1.Making custard cream, Combine egg yolk and sugar in a bowl whisking until you got paler color. Put flour in the bowl, combine them together.
2. Put vanilla bean in milk and bring it on low fire. When hot, pour the ingredient into the bowl in (1.) and pour in back to the pot. Bring it on low to medium fire until well blended.

When you finished making custard, leave it to cool then we do the assemble.
Cut kiwi into square, mixing with the custard. Cut croissant halfway, put in ready mixed kiwi and custard. Sprinkle with icing sugar.


See, it's very easy. Don't forget to try some. :)


Monday, August 2, 2010

・Take me to the moon ・ Take Boo to the pool ・


พาบูไปว่ายน้ำมา เนื่องจากว่าเจ้าของมันขี้อิจฉา เห็นคนพาหมาไปว่ายน้ำเวลาพาบูไปหาหมอก็อยากเล่นแบบนั้นบ้าง

ฉะนั้นถ้าใครอยากเล่นแบบเจ้าของบล๊อกต้องทำตามวิธีการต่อไปนี้นะเด้อ

เริ่มจากหาหมอครั้งล่าสุด (18 กรกฎาคม 53) หมอบอกว่าบูอาการดีขึ้นมาก สร้างกระดูกได้เกือบสมบูรณ์ เพียงแต่ยังมีรอยแตกที่เห็นชัดอยู่ 1 รอย ก็เลยต้องกินยาสร้างกระดูก และอัดแคลเซียมต่อไป
แถมหมอยังบอกว่าผิวหนังดูจะแห้งแตกส่งผลให้ขนไม่สลวยเงางาม จึงขอสั่งยาบำรุงผิวและขนให้อีก 1 ชุด (ครั้งนี้บิลมา 1,800 บาท โฮก...)

ก่อนกลับแอบอ้อนหมอว่า หมอขา หนูอยากให้หมาหนูได้เล่นว่ายน้ำป๋อมแป๋มบ้างต้องทำจะใด
หมอบอกว่า โอ้ กู้ดดดด การว่ายน้ำนั้นดีต่อการสร้างกระดูกมาก และยังเป็นการออกกำลังที่ไม่ก่อให้เกิดแรงกระแทกอีกด้วย หมอจึงจัดการเซ็นลงในแฟ้มประวัติว่าให้มาทำ "ธาราบำบัด" อาทิตย์ละครั้ง (แนะ... ยังกะมาสปา)

ลงมาติดต่อฝ่ายประชาสัมพันธ์ นัดวันให้เรียบร้อย นัดได้ 4 ครั้ง อาทิตย์ละครั้ง ก็จะครบกำหนดพบหมอเพื่อประเมินอีกครั้งว่าต้องทำ ธาราบำบัดต่อไปหรือไม่ จัดการนัดวันเรียบร้อย (นัดได้แค่ 2 ครั้ง เพราะกลางเดือน (สิงหาคม 53) นี้สระปิดปรับปรุงฮะ)

แล้วก็รอ ร้อ รอ จนถึงวันนัดครั้งแรกก็คือเมื่อวานนี้ (1 สิงหาคม 2553)

ถึงวันนัดหมาย หมาเราใจง่าย เปิดประตูรถปุ๊บ ก็โดดขึ้นปั๊บ ไม่ได้รู้ถึงชะตาชีวิตตัวเองเล้ยยยย กั่กๆๆๆๆ
(¬_¬)

ถึงโรงพยาบาลสัตว์เวลา 11 โมง ก็ไปยื่นเอกสารที่ประชาสัมพันธ์ แล้วมารอจ่ายเงิน
ซึ่งแพงโพด T . T (360 บาทต่อครั้ง) แพงกว่าสระคนอีกง่ะ.. แต่ก็เอาวะ เพื่อบูที่รัก แม่ยอมได้ลูก

ถึงเวลานัด 11 โมงครึ่ง ก็พุ่งไปที่สระว่ายน้ำ ล้างตัวให้เรียบร้อยก่อนลงสระ
เห็นสระป๊าบ... เฮ้ย! นี่มัน "สระมรกต" ชัดๆ เขียวได้อีกค่ะ จริงๆถ้าทำดีๆ เป็นแหล่งท่องเที่ยวได้เลยนะคะเนี่ย

ต่อค่ะ พอเหยื่อมาถึงก็ต้องจับใส่ชูชีพก่อน ซึ่งด้านบนของชูชีพจะมีมือจับ คุณพี่คุมสระก็จะจัดการยึดตรงที่จับนี่กับตะขอที่ติดกับเชือก ที่จะพาดระหว่างสระค่ะ ผลก็คือจะทำให้หมาน้อยของเราเท้งเต้งอยู่กลางน้ำ (มันก็จะรู้สึกว่า) ต้องว่ายน้ำเพื่อเอาชีวิตรอดค่ะ ซึ่งจริงๆแล้วถึงมันไม่ว่าย มันก็ไม่จมหรอกค่ะ เพราะว่ามีชูชีพอยู่ แต่ว่ามันไม่รู้นี่นา ก็ว่ายใหญ่เลยค่ะ พร้อมสายตาเว้าวอน ให้เอาชั้นออกป๊ายยยยยยย.... อิเจ้าของก็ไม่สนใจค่ะ นั่งหัวเราะกั่กกกกๆๆๆๆๆ ถ่ายรูป เดินไปซื้อน้ำมานั่งดูด สบายใจเฉิบ

ว่ายได้ 5 นาทีก็กลับขึ้นบกค่ะ พัก 5 นาที ซึ่งกิจกรรมนี้จะดำเนินไปทั้งหมด 4 รอบค่ะ คุณคุมสระบอกว่า อย่าคิดว่าว่าน้อยๆนะ เราก็อืม.. เห็นด้วยค่ะ เพราะหมามันไม่รู้อ่ะ ตกน้ำไปมันก็ว่ายป๋อมแป๋มเอาตัวรอดสุดแรง ว่ายเท่าไหร่ก็ไม่ถึงฝั่งก็ยิ่งออกแรง รอบที่ 3-4 นี่เห็นชัดเลยค่ะ บูตีน้ำแรงมาก หายใจหอบแรงสุดๆ จนขึ้นรถมาแล้วยังหอบอยู่เลย

รอบแรกนี่บูยังมองเจ้าของอยู่ค่ะ ออกแนวว่า ช่วยหนูด้วยยยย ปล่อยหนูปายยยย
แต่รอบที่ 2 เริ่มมองไปที่บันไดขึ้นสระค่ะ ฉันมาทางนี้ ฉันก็จะกลับทางนี้ แหม่ ฉลาดนะเอ็ง
รอบสาม-สี่ ไม่สนใจอะไรแล้วค่ะ เจ้านายช่วยกรูไม่ได้แล้ว หมุน 360 องศาเลย หาทางออกจากนรกสปา ฮ่า... แถมยังพยายามกัดเชือกอีกตะหาก

ครบ 4 รอบป๊าบก็จับมาอาบน้ำค่ะ ด้านล่างสระจะมีที่อาบน้ำแล้วก็ไดร์เป่าขนพลังเทอร์โบให้ แต่ว่าเราต้องเตรียมแชมพูกับผ้าขนหนูมาเองนะคะ

จบภารกิจแล้วก็กลับบ้านกันค่ะ บูสลบเหมือดเลยทีเดียว (หรืองอนไม่รู้ค่ะ) หันหลังให้เลย


เจ้าของก็สลบด้วยค่ะ อากาศวันนี้ร้อนจัดจริงๆ
ใครว่างลองพาหมาไปออกกำลังกายวิธีนี้กันดูนะคะ เหมาะกับหมาแรงเยอะๆอย่างบูลเทอร์เรียด้วย เพราะว่าหมาประเภทนี้จะมี
พลังงานส่วนเกินเยอะกว่าหมาพันธุ์อื่นๆ เวลาพาบูไปเดินออกกำลังทีไร เจ้าของมันเหนื่อยก่อนทุกทีเลยค่ะ แถมเวลาหมาเหนื่อยๆก็จะช่วยให้เราฝึกได้ง่ายขึ้นอีกด้วยนะเออ
แถมให้อีกนิดนึง ถ้าไปวันธรรมดาราคาจะถูกลงฮวบฮาบเลยค่ะ :)


Saturday, July 31, 2010

・My Homemade White Bread ・

เมื่อวานนี้ลองทำขนมปังค่ะ ใช้สูตรของคุณเศรษฐพงศ์ เผ่าวัฒนา จากหนังสือเล่มนี้


ผลออกมาเป็นที่น่าพอใจค่ะ เนื้อขนมปังเหนียวนุ่มดี ยิ่งทานตอนร้อนๆ ทาเนย หืม.. อร่อยม๊ากกกกส์ (เวอร์ไปมั้ย :b)

ไม่พูดพล่ามทำเพลงแล้วค่ะ เริ่มทำกันเลยดีกว่า
(สูตรค่อนข้างยาวและละเอียดนะคะ ลงไว้เผื่อคนที่ยังไม่ชำนาญ ค่ะ แต่ถ้าใครโปรแล้วก็อ่านข้ามๆได้เลยค่ะ)

・White Bread ・
พิมพ์ขนมปังขนาด 5x9 นิ้ว หรือใหญ่กว่านี้เล็กน้อย ทาเนยขาวในพิมพ์บางๆ (เราใช้น้ำมันแบบสเปรย์ฉีดเอาค่ะ)

ส่วนผสม
ยีสต์ (Instant yeast) 1 ช้อนโต๊ะ
น้ำตาลทรายป่น 3 ช้อนโต๊ะ
เกลือป่น 1+ 1/2 ช้อนชา
นมสด 1+ 2/3 ถ้วย
เนยจืดละลาย 2 ช้อนโต๊ะ
(วันที่ทำใช้เนยกระเทียมค่ะ เลยได้ขนมปังกลิ่นกระเทียมด้วย :) หอมดี)
แป้งสาลีสำหรับทำขนมปัง 4+ 3/4 ถ้วย

วิธีทำ
・ แบ่งแป้งออกมาจากสูตร 1 ถ้วย ใส่ลงในอ่างผสม ใส่ยีสต์และน้ำตาลทรายลงไป คนให้เข้ากัน รินนมอุ่นลงไปครึ่งถ้วย (อุณหภูมิประมาณ 60 องศาเซลเซียส หรือร้อนในระดับที่หลังมือแตะแล้วทนได้) คนให้เข้ากัน ใส่แป้งลงไปอีกครึ่งถ้วย คนให้เข้ากัน
・ นำเนยละลายที่ยังอุ่นและเกลือเติมลงในส่วนผสมนมที่เหลือ คนให้เข้ากันกด้วยพายยาง รินนมครึ่งถ้วยลงในอ่างแป้ง คนให้เข้ากัน ใส่แป้งลงไปอีก 1 ถ้วย คนพอให้แป้งเกาะเป็นก้อน รินนมลงไปอีก ทำสลับกันเช่นนี้ให้จบที่ส่วนผสมแป้ง
(แต่ถ้าหมดสูตรตวงแล้ว แป้งยังเป็นก้อนแฉะๆ ให้เติมแป้งลงไปอีกทีละน้อย จนก้อนแป้งเกาะตัวและไม่ติดกับอ่างผสม แต่ถ้าก้อนแป้งแห้งเกินไป ให้เติมนมอุ่นครั้งละ 1-2 ช้อนชา)
・โรยแป้งสาลีทำนวลที่หน้าโต๊ะ นำก้อนแป้งนวดกับหน้าโต๊ะ โดยใช้สองมือวางทาบลงไปบนก้อนแป้ง ผลักออก โดยใช้สันมือบังคับแป้ง ดึงกลับเข้าหาตัว โดยใช้ปลายนิ้วบังคับ ผลักออก ดึงเข้า ทำเช่นนี้จนก้อนแป้งเป็นรูปยาว (เหมือนเราปั้นดินน้ำมันเป็นแท่งยาวๆ) ทบสองข้างของแป้งเข้ามาตรงกลาง นวดในจังหวะเดิมอีก

*แต่ละคนจะมีเทคนิคการนวดแป้งแตกต่างกัน อย่างไรก็ตาม ก็ต้องอาศัยหลักการยืดก้อนแป้งและรวมก้อนแป้งเช่นนี้ หรือจะใช้มือซ้ายยึดปลายก้อนแป้ง แล้วใช้สันมือขวาผลักก้อนแป้งออก ดึงกลับด้วยปลายนิ้วมือขวา หรือใช้เครื่องผสมอาหาร หรือเครื่องตีไข่ที่นวดขนมปังก็ได้ แต่ควรเป็นเครื่องขนาดใหญ่ เพราะแรงของมอเตอร์ที่มีมาก จะทำให้นวดได้ดีกว่าเครื่องขนาดเล็ก

・นวดขนมปังประมาณ 10 นาที (ถ้านวดด้วยมือ) สังเกตดูว่าผิวก้อนแป้งตึง หรือมือแรงต้นตึงๆเมื่อกดลงไป แสดงว่ายีสต์ทำงาน ให้นำไปหมักครั้งแรกในอ่างผสมที่สะอาดโดยทาไขมัน (เนยขาว - เราใช้สเปรย์น้ำมันอีกเช่นเคย) บางๆที่อ่างผสม เพื่อกันแป้งติด คลุมปากอ่างด้วยผ้าบางและสะอาดที่ชุบน้ำบิดหมาดไว้ ทับด้วยจานใบใหญ่ๆที่ปิดฝาอ่างได้ เพราะยีสต์ชอบที่มืดและอุ่น นำอ่างผสมวางไว้ในที่ที่ไม่ถูกแสงแดด อุณหภูมิที่เหมาะกับการหมักแป้งคือ 30 องศาเซลเซียส ไม่จำเป็นต้องเคร่งครัดมากนักก็ได้ แต่ถ้าเย็นกว่านี้อาจต้องใช้เวลาหมักนานกว่าที่กำหนด
・หมักแป้งไว้ราว 1 ชั่วโมง หรือจนแป้งขึ้นฟูประมาณ 2 เท่า
・ ทาเนยขาวบางๆที่หน้าโต๊ะและไม้นวดแป้งหรือขวดทรงกระบอก นำแป้งออกมาวางบนโต๊ะ คลึงแป้งให้แผ่เป็นแผ่นเพื่อไล่อากาศออก (ช่วงนี้ฟองอากาศข้างในแป้งแตกดังโป๊ะๆ สนุดกีค่ะ) จากนั้นม้วนแป้งเป็นแท่งแน่นๆ ทบสองข้างแป้งเข้าหาตรงกลาง นวดแป้งตามวิธีนวดโดยใช้มือ พอให้แป้งรวมเป็นก้อนกลม พักแป้งไว้ราว 10 นาที
・คลึงแป้งด้วยไม้นวดแป้งให้แผ่เป็นแผ่นกว้างราว 8x15 นิ้ว ม้วนตามความกว้างให้แน่น จะได้แท่งก้อนแป้งขนาด 8 นิ้วหนึ่งก้อน นำแป้งใส่ลงในพิมพ์ที่เตรียมไว้ ให้ด้านที่เป็นตะเข็บหรือบริเวณปลายแผ่นแป้งมาบรรจบคว่ำลงก้นพิมพ์ นำไปพักในที่ที่เหมาะสมข้างต้น ปล่อยให้แป้งฟูขึ้นเป็นสองเท่า หรือราว 1 ชั่วโมง นำเข้าเตาอบนาน 45 นาที (ของเราแค่ประมาณ 30 นาทีล่ะ)
・นำขนมที่อบเสร็จแล้วออกจากเตา พักไว้ 5 นาที ก่อนนำออกจากพิมพ์ พักไว้บนตะแกรง

*หมายเหตุ: ขนมปังขาวสูตรรนี้เนื้อขนมปังจะนุ่มและแน่น มีน้ำหนัก ไม่เบาฟูเหมือนขนมปังที่ทำในระบบอุตสาหกรรม ปล่อยให้เย็นก่อนจึงใช้มีดฟันเลื่อย "เลื่อย" ขนมปังเป็นแผ่นๆตามจำนวนที่ต้องการรับประทาน (ผู้เขียนใช้คำนี้เพราะถ้าใช้คำว่า "ตัด" มักเข้าใจว่าใช้มีดตัดลงไปตรงๆ ซึ่งจะทำให้เนื้อขนมปังยุ่ย) ไม่ต้องเลื่อยออกมาเป็นแผ่นหมดทั้งก้อน เวลาจะรับประทานจึงนำมาเลื่อยแล้วปิ้ง จะสดเหมือนทำใหม่ขนมปังชนิดนี้เก็บไว้ในตู้เย็นได้หลายวัน

ขอแถมจากในหนังสือนิดนึงนะคะ เนื่องด้วยเจ้าของบล๊อกไม่เคยอบขนมปังก็เลยไม่รู้ว่าขนมปังสุกเนี่ย เค้าดูกันยังไง ก็เลยลอง search ดู เพื่อนๆคนอื่นแนะนำว่าให้เอาออกจากเตาอบแล้วเคาะดูค่ะ ถ้าเสียงกลวงๆ ก็แปลว่าสุกแล้ว แต่เอิ่ม.. เจ้าของบล๊อกลองเอามาเคาะจนมือพองยังไม่รู้เลยค่ะ ว่านี่เรียกว่ากลวงรึยัง -____-'
และด้วยความที่ทำแต่เค้ก ตอนหยิบออกมาจากเตาครั้งแรก ลองจับผิวขนมปังดูแล้วมันแข็งมาก ตอนนั้นอยากร้องไห้เลยค่ะ คิดในใจว่าเจ๊งแน่แล้ว ฮือ... T . T

เลยคิดว่าไม่เอาแล้ว อบอีกแป๊บเดียว แล้วก็เอาออกมาเลย

แต่ปรากฏว่าพอขนมปังเริ่มเย็นมันก็นิ่มขึ้นอ่ะค่ะ แหะ ก็เค้าไม่รู้ง่ะ :b

ต้องสารภาพว่าตอนแรกไม่ค่อยกล้าทำขนมปังเท่าไหร่ เพราะกลัวทำเจ๊งอ่ะค่ะ แถมใช้แป้งเยอะมากเลย ถ้าเจ๊งคงเสียดาย แต่พอลองทำดูแล้วสำเร็จก็รู้สึกภูมิใจดีนะคะ ยิ่งเวลาที่เราพักแป้งไว้ แล้วกลับมาดูอีกทีมันฟูจนล้นพิมพ์เนี่ย กรี๊ดเลยค่ะ มันอะเมซิ่งมาก (ไม่รู้ว่าคนอื่นเป็นเหมือนกันรึเปล่า)


ใครที่ยังกล้าๆกลัวๆอยู่ ลองดูนะคะ สนุกดีค่ะ แถมตอนนวดแป้งก็ได้ออกกำลังดีด้วยล่ะ :)